OneDeck Help Center
How to Create Automated Workflow
OneDeck empowers you to create automated workflows (scenarios) using triggers to perform actions. By defining conditions with logical operators, you can enable actions like creating or updating records, sending emails, notifying users, and more.
These workflows streamline processes by automatically executing tasks based on specific events or criteria, reducing manual effort and enhancing efficiency.
In this documentation, we’ll walk you through the steps on how to:
- Add Scenario
- Select Trigger
- Set Conditions
- Add Actions
Let’s get started 🚀
Add Scenario
To create an automated workflow in OneDeck, add a scenario that serves as the foundation, enabling triggers and conditions to execute specified actions seamlessly.
Step 1: Go to the Automation button on the top-right side of the interface.
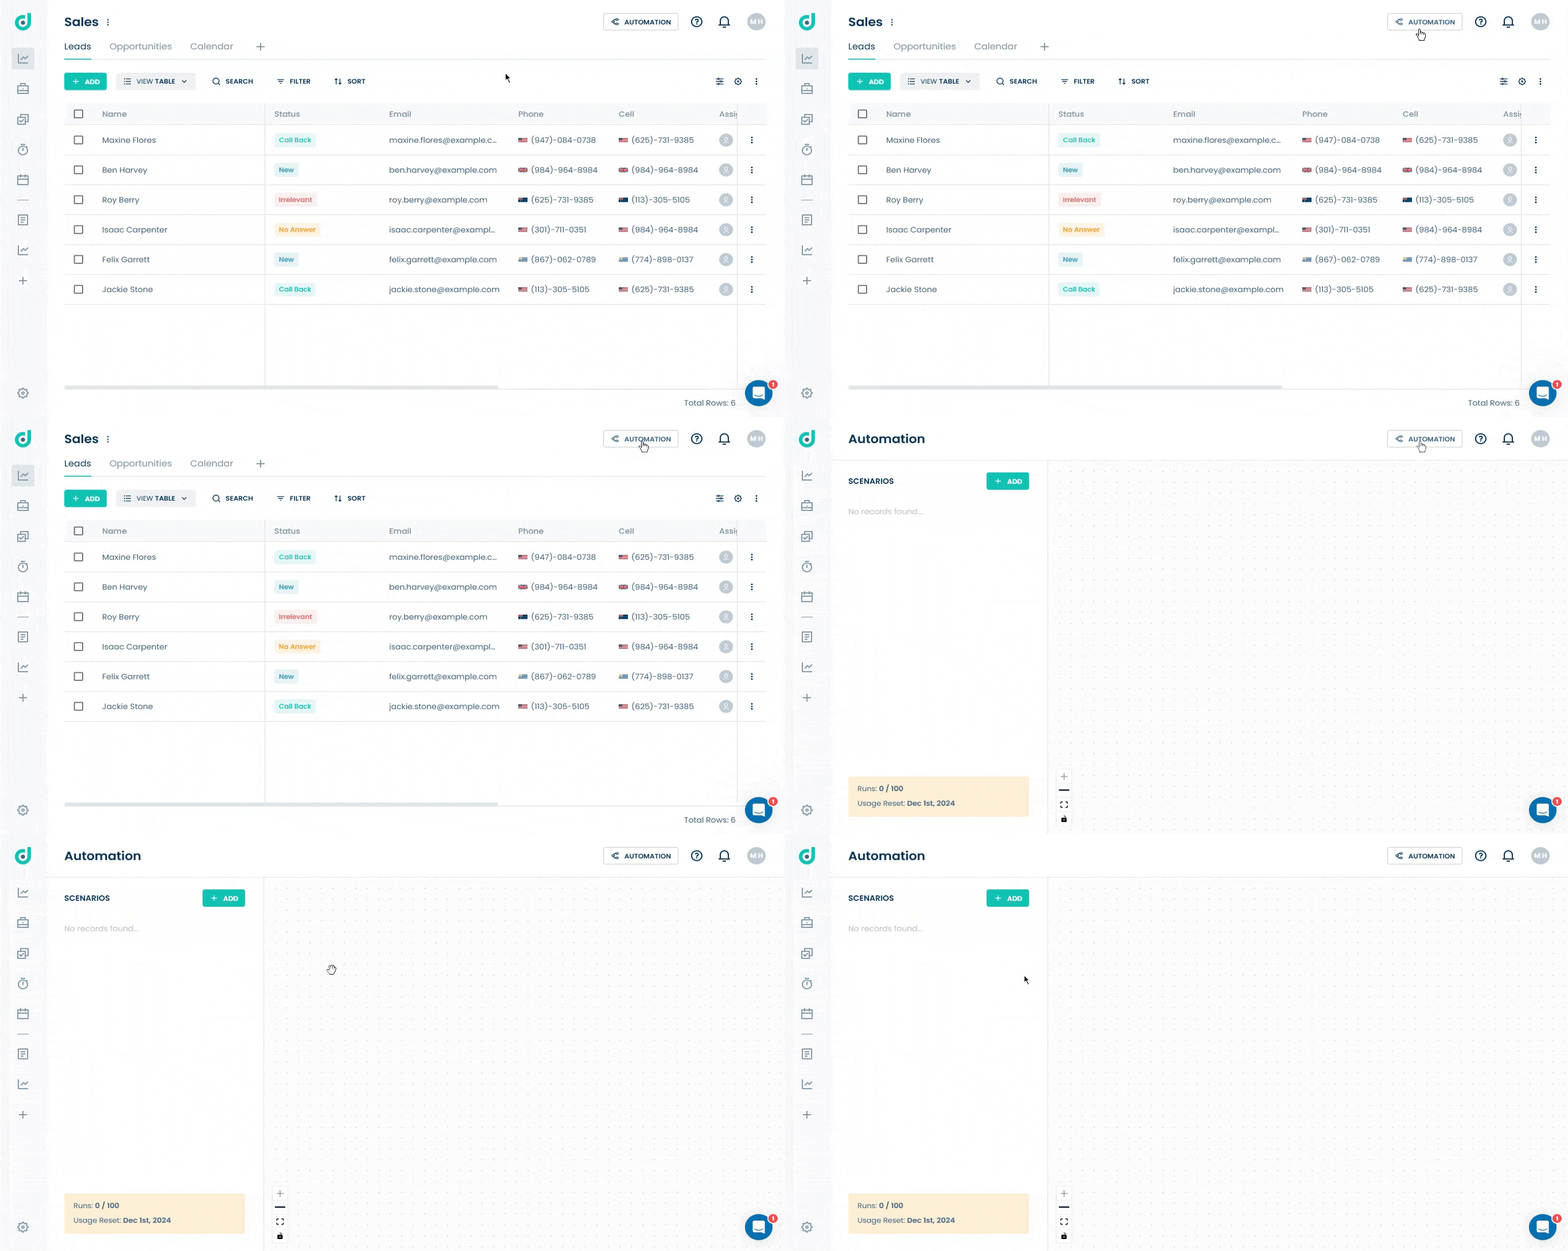
Step 2: Click the + ADD button at the top left corner and add a name for the scenario.
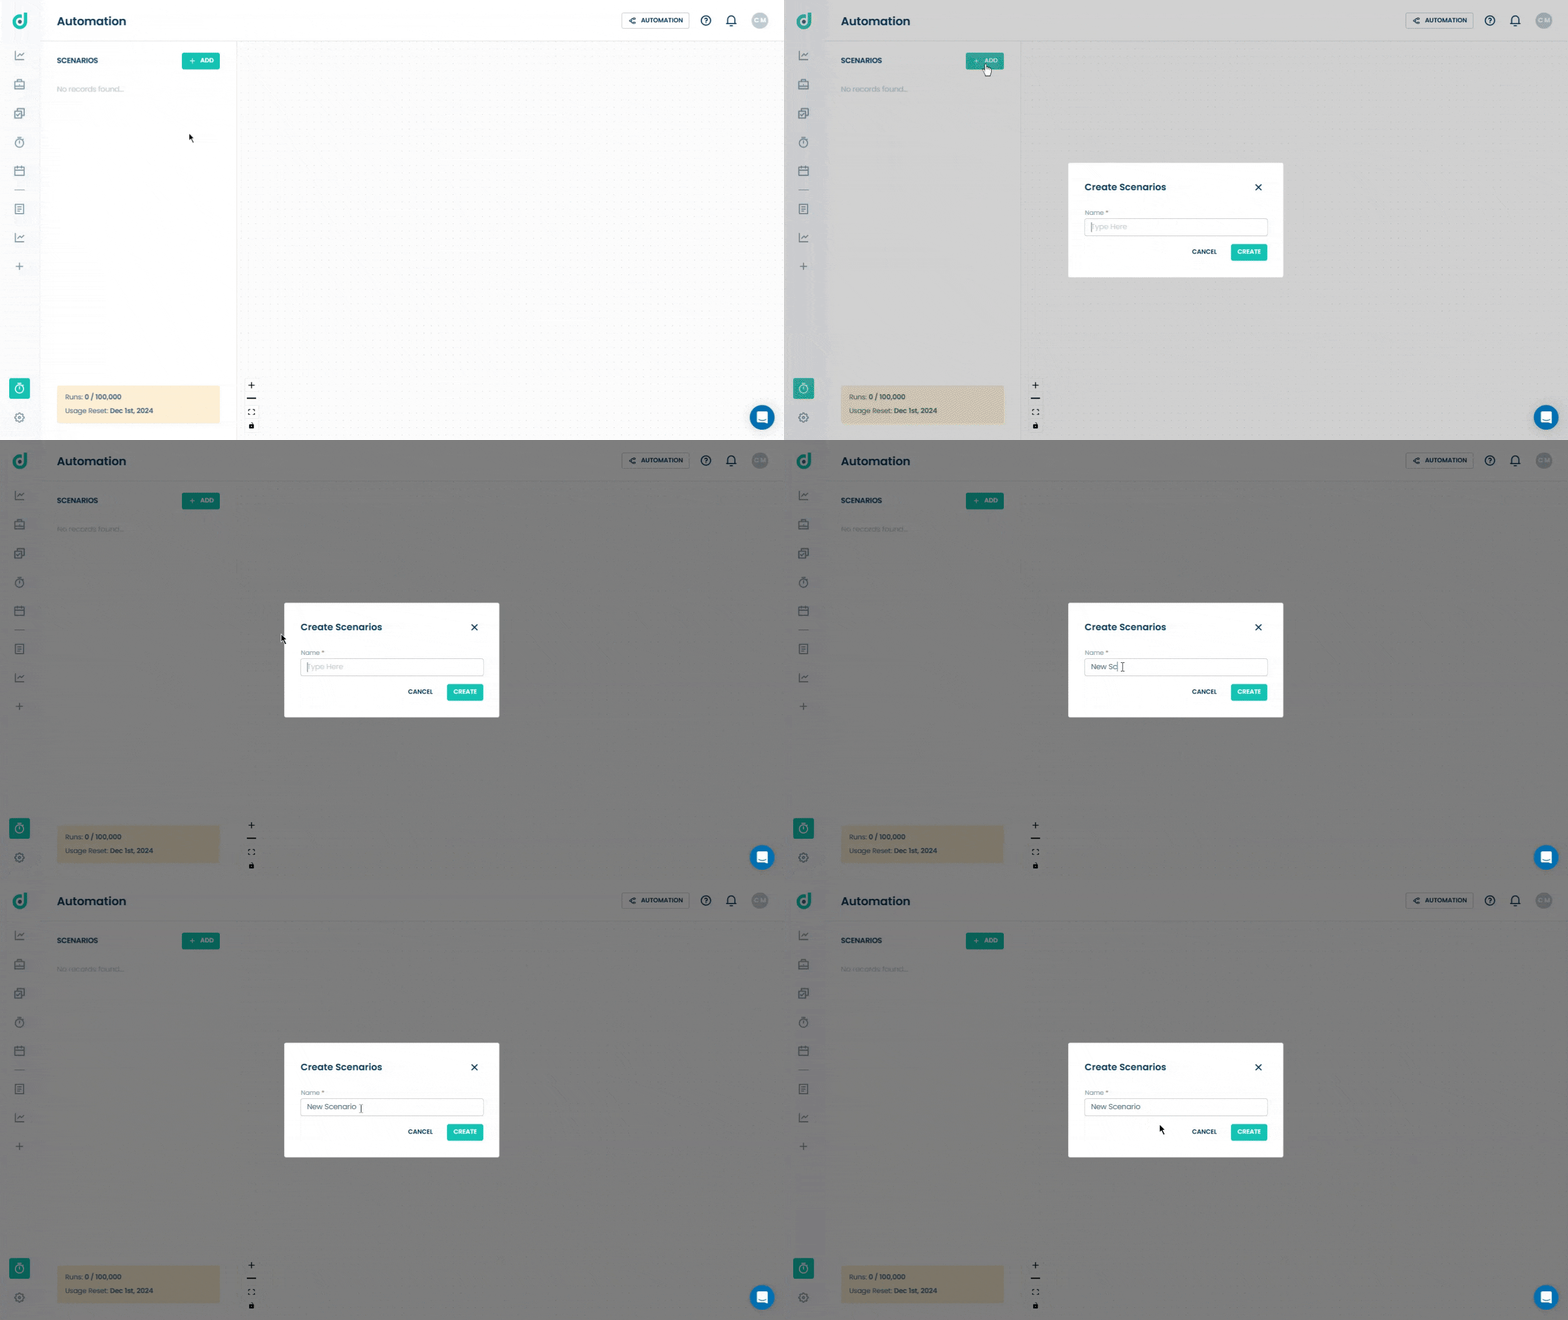
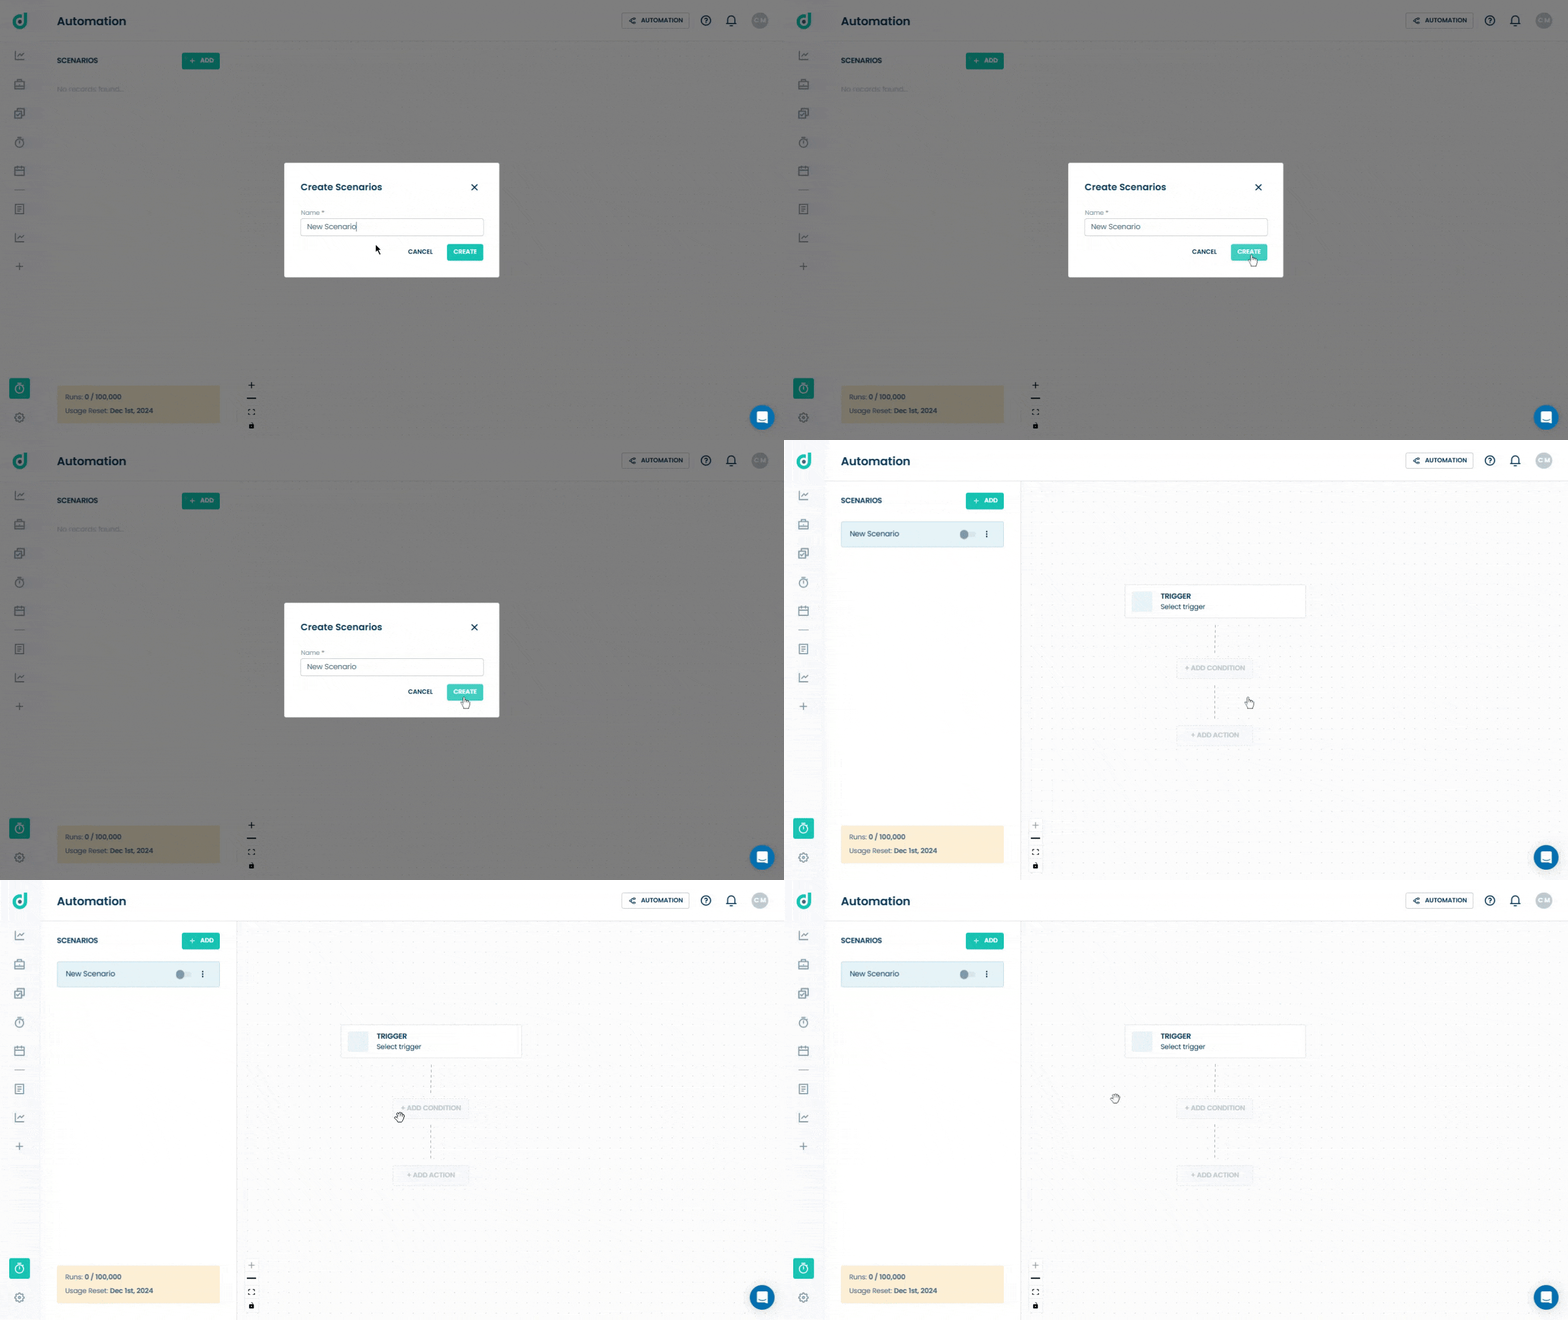
Step 3: Click on the CREATE button.
Select Trigger
Once the Scenario is created, you can use the following triggers to automate actions whenever the triggered options meet predefined conditions with logical operators.
- Record Created
- Record Converted
- Record Updated
- Document Published
Record Created
The trigger activates automatically whenever a new record is added to the designated board.
Step 1: Select the Record Created option as your trigger.
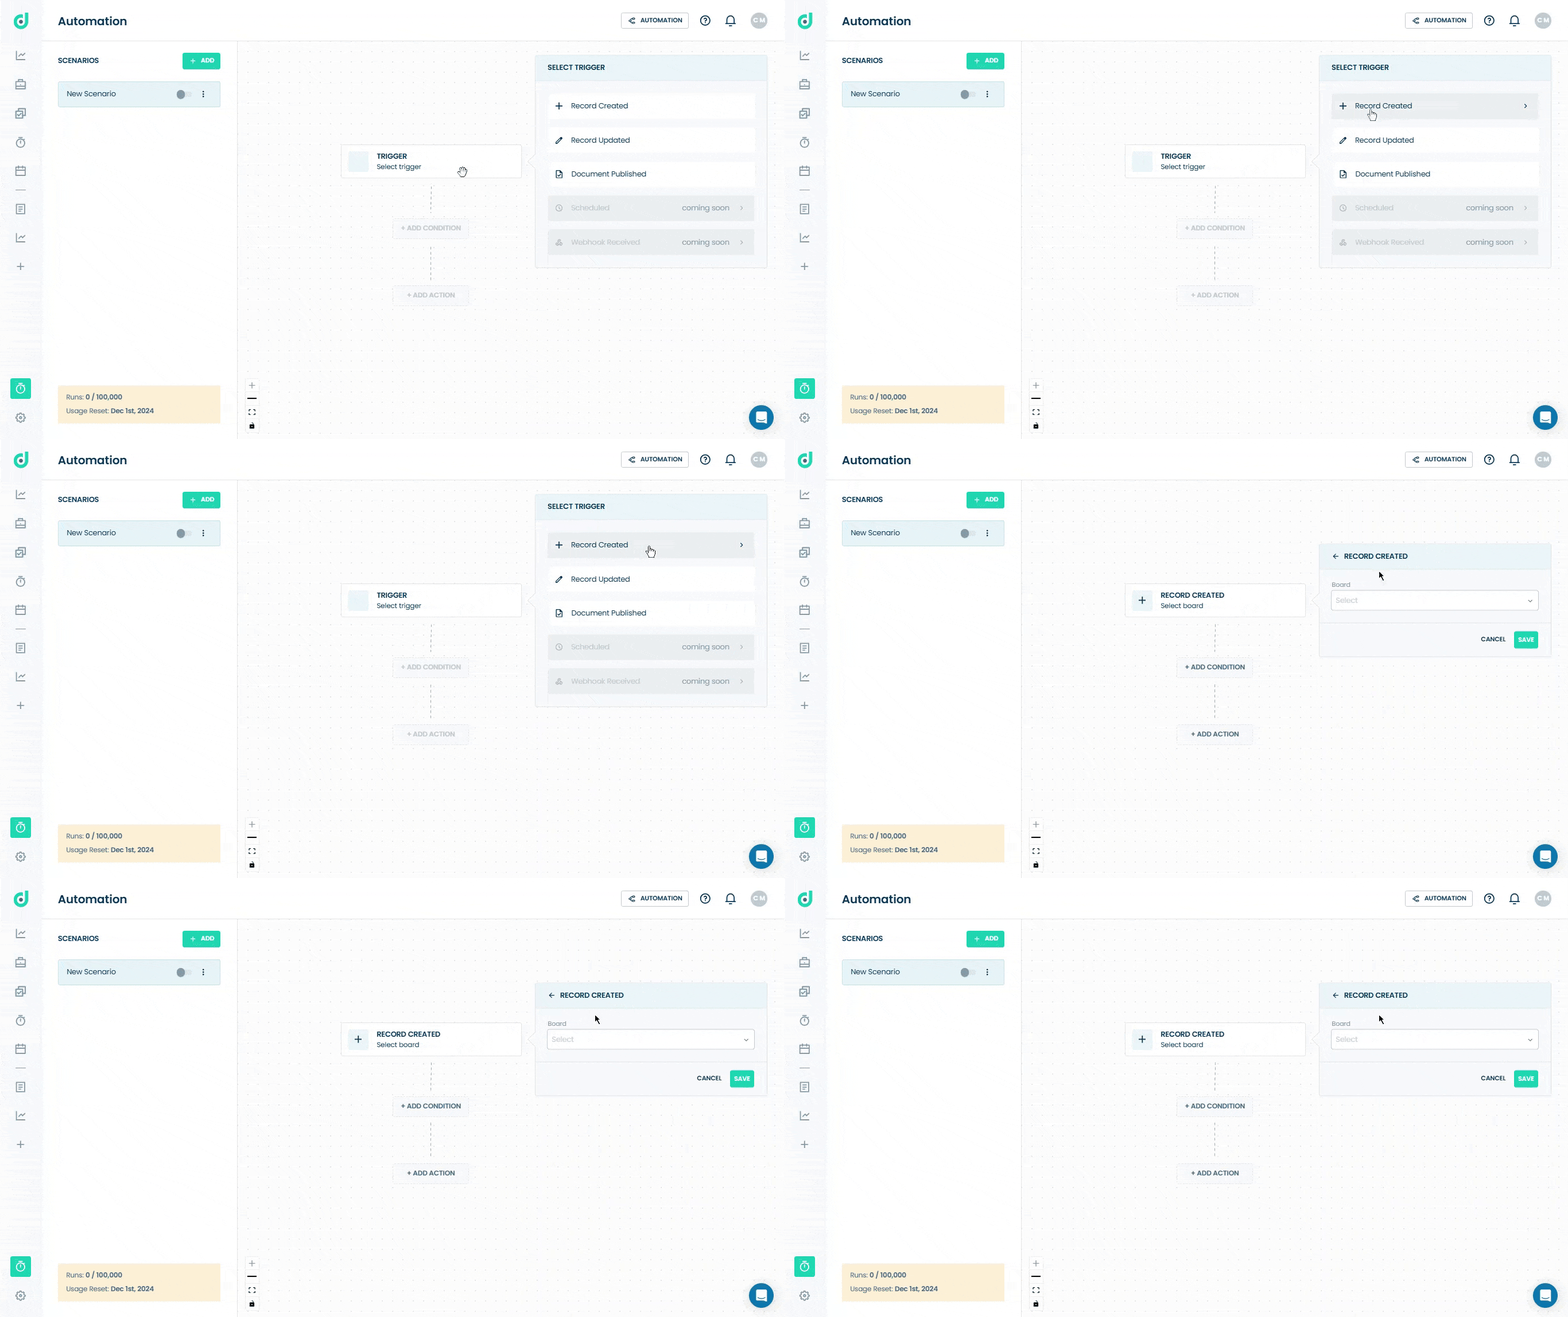
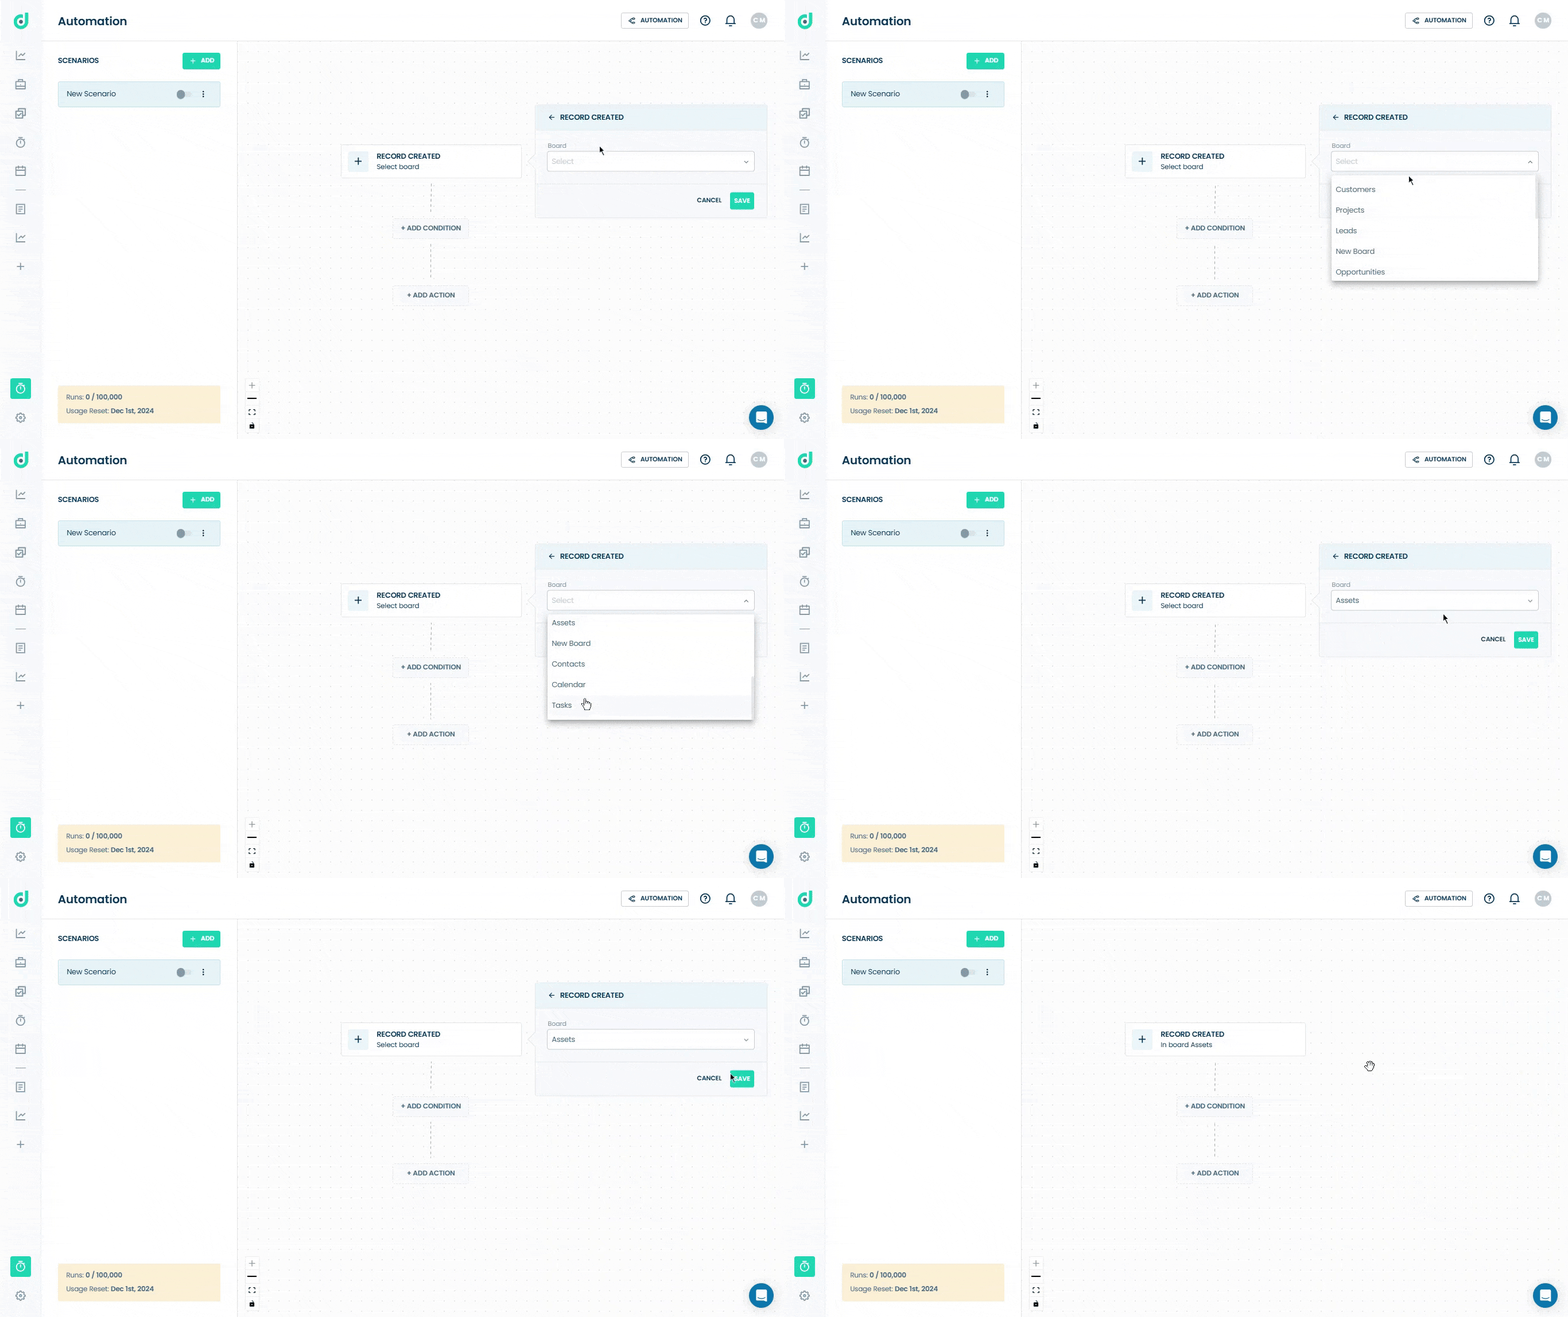
Step 2: Select the Board that will activate the trigger whenever a new record is added to it and click on the Save button.
Record Converted
The trigger activates automatically whenever a record is converted to another board.
Step 1: Select the Record Converted option as your trigger.
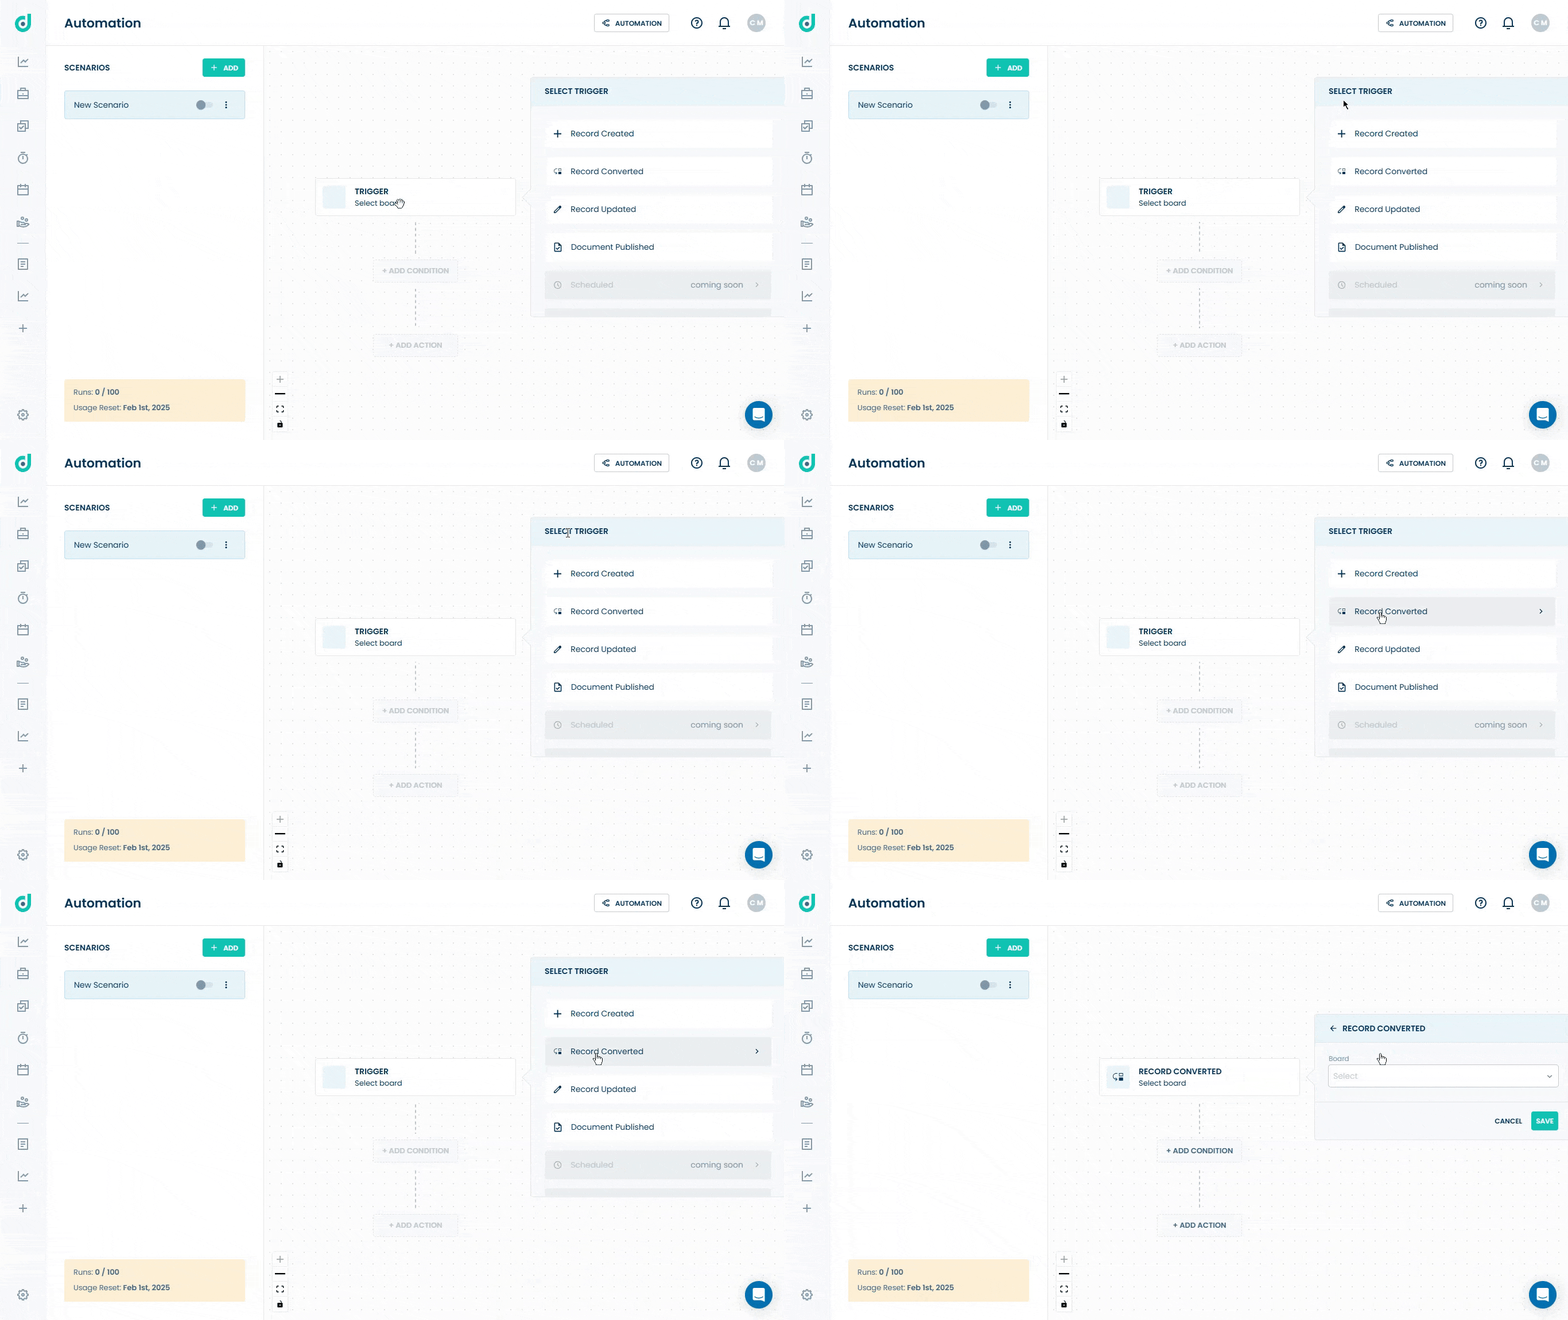
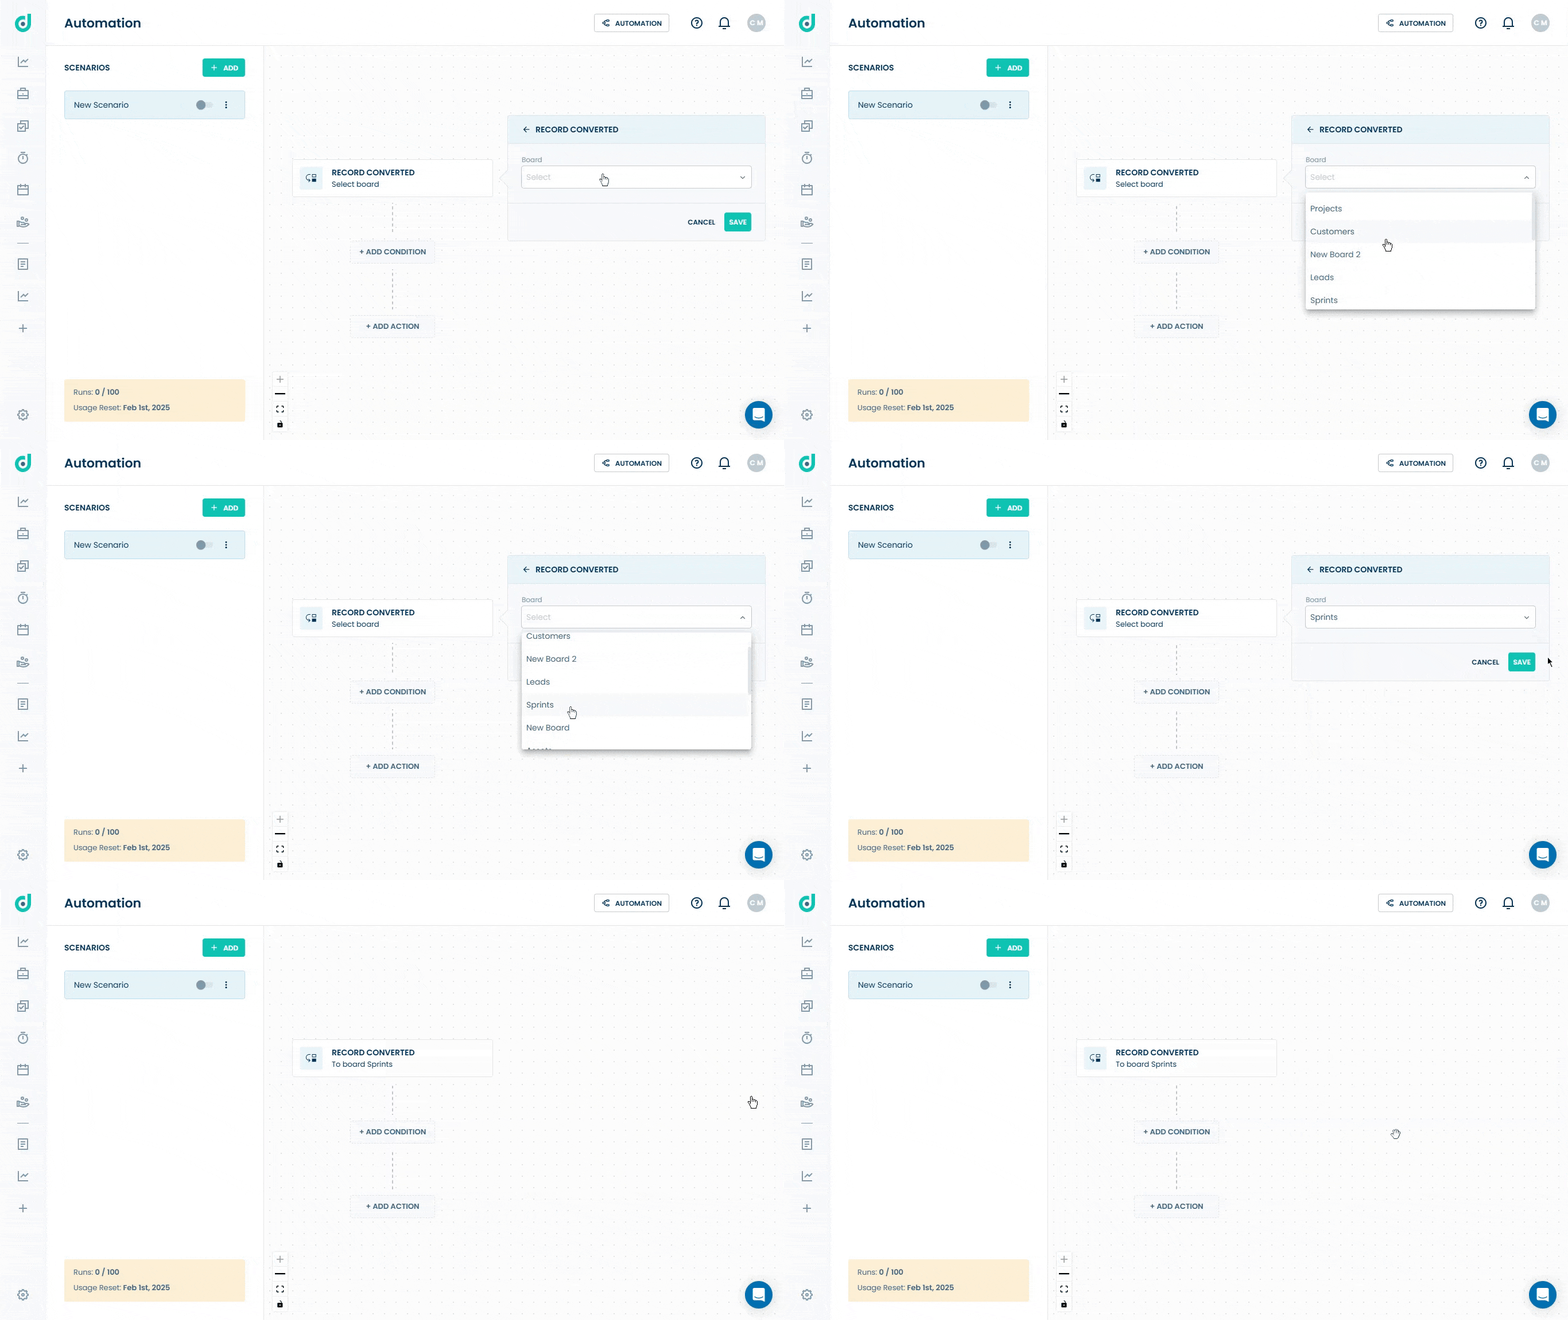
Step 2: Select the Board that will activate the trigger whenever a record is converted on it and click on the Save Button.
Record Updated
The trigger activates automatically whenever a record on the designated board is updated.
Step 1: Select the Record Updated option as your trigger.
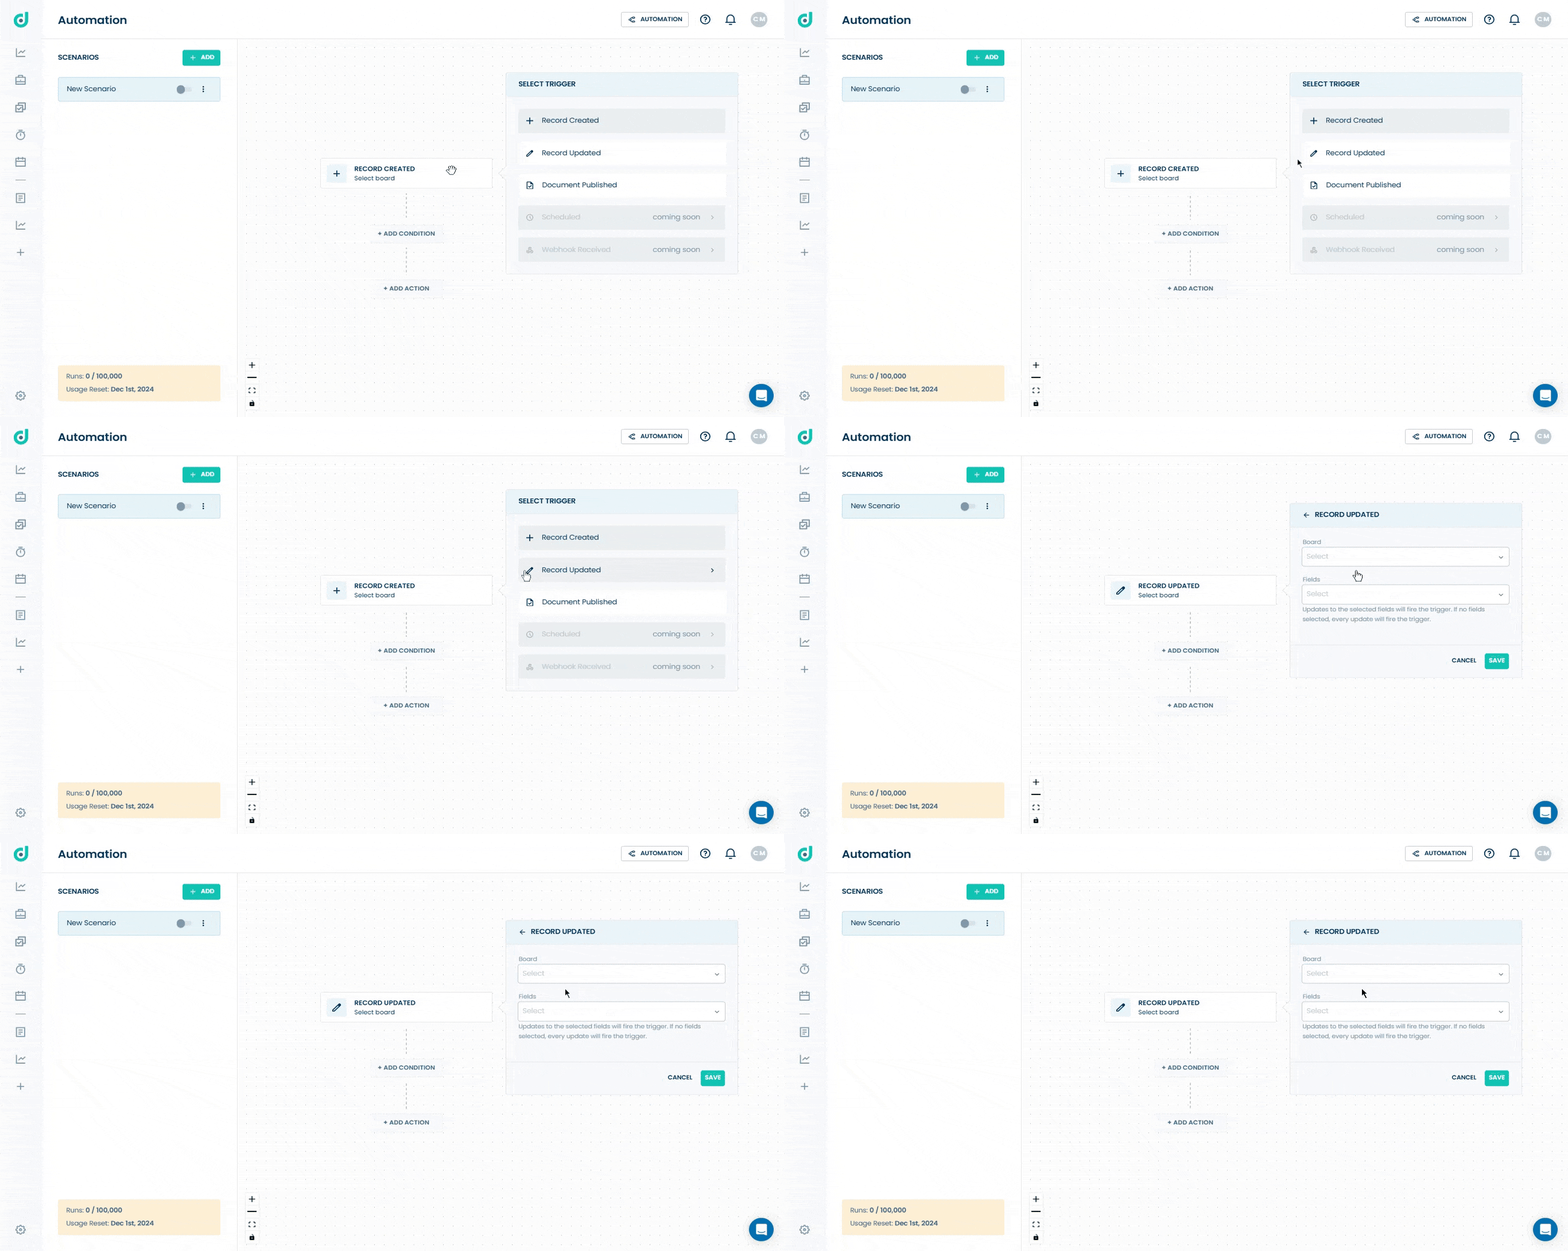
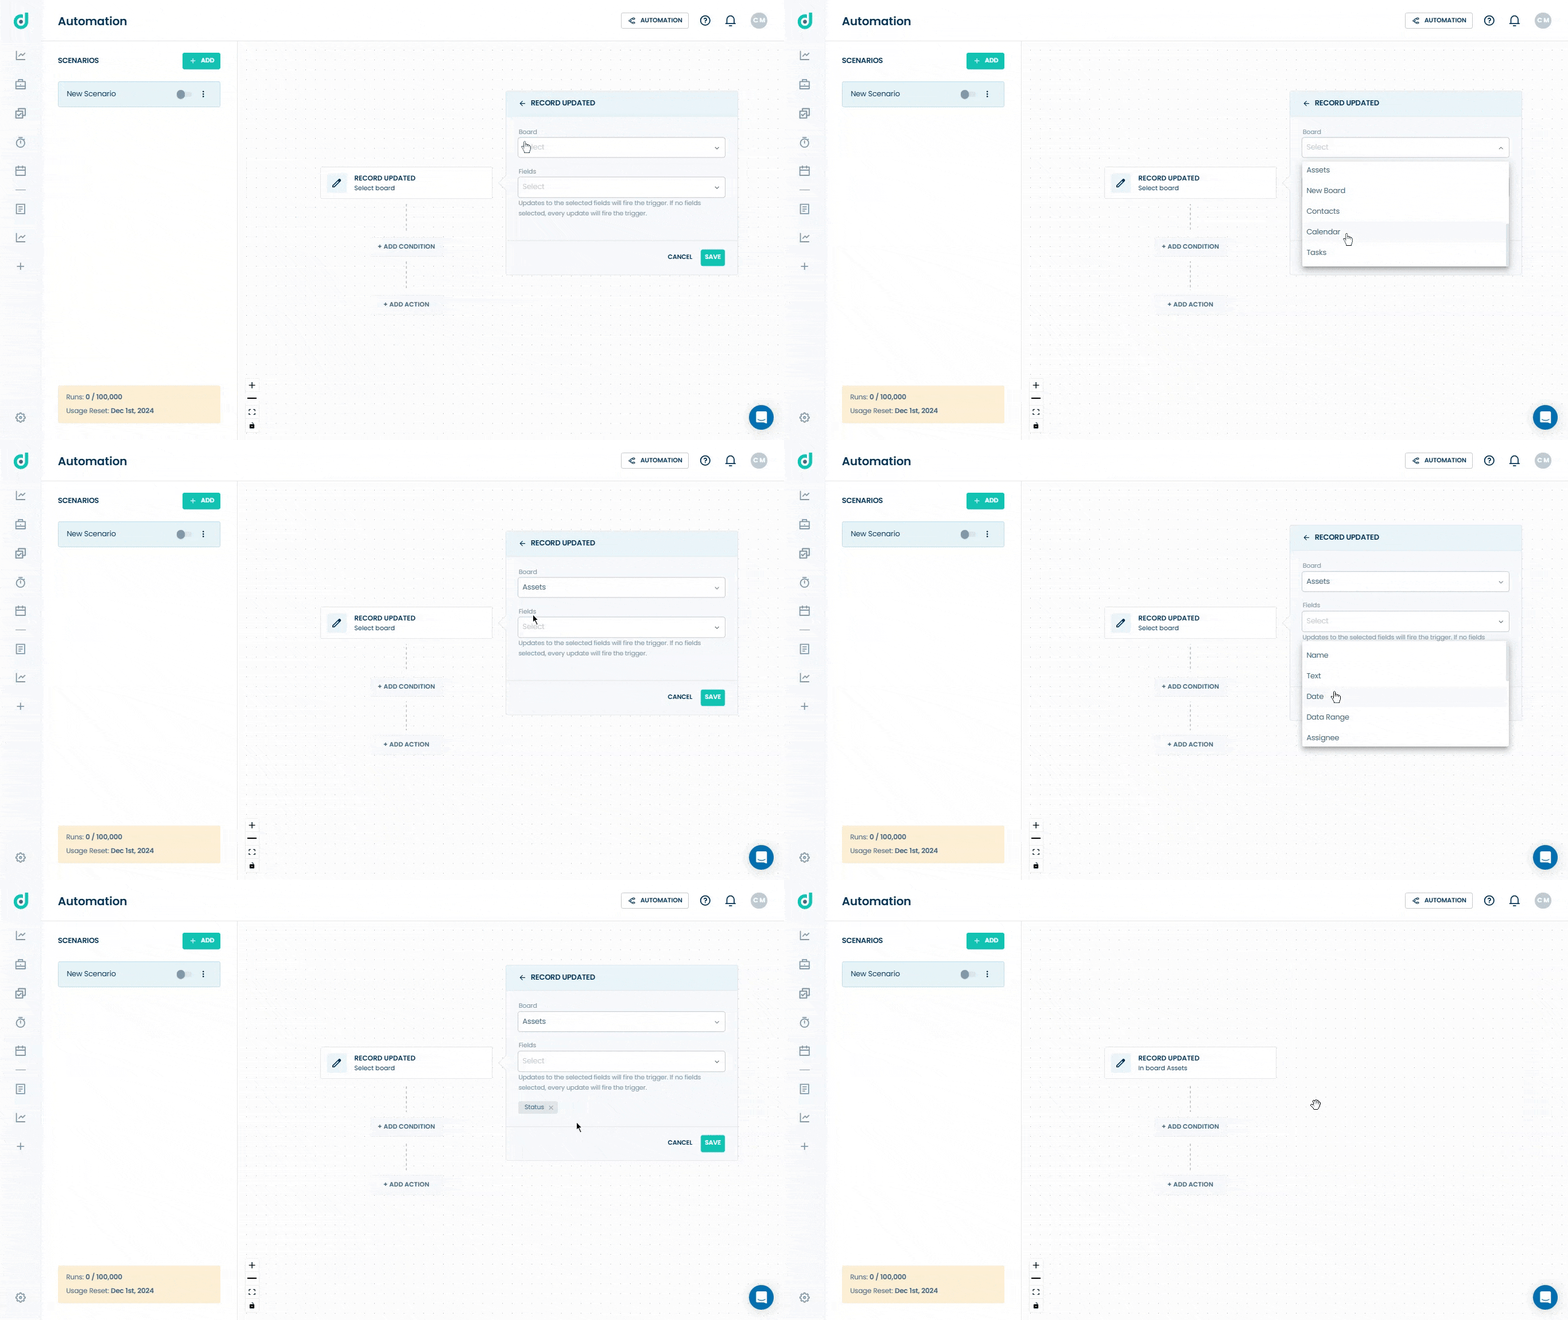
Step 2: Select the Board and the fields that will activate the trigger whenever a record is updated on it and click on the Save button.
Note: The trigger activates when the selected fields are updated. If no fields are selected, it will activate for every update.
Document Published
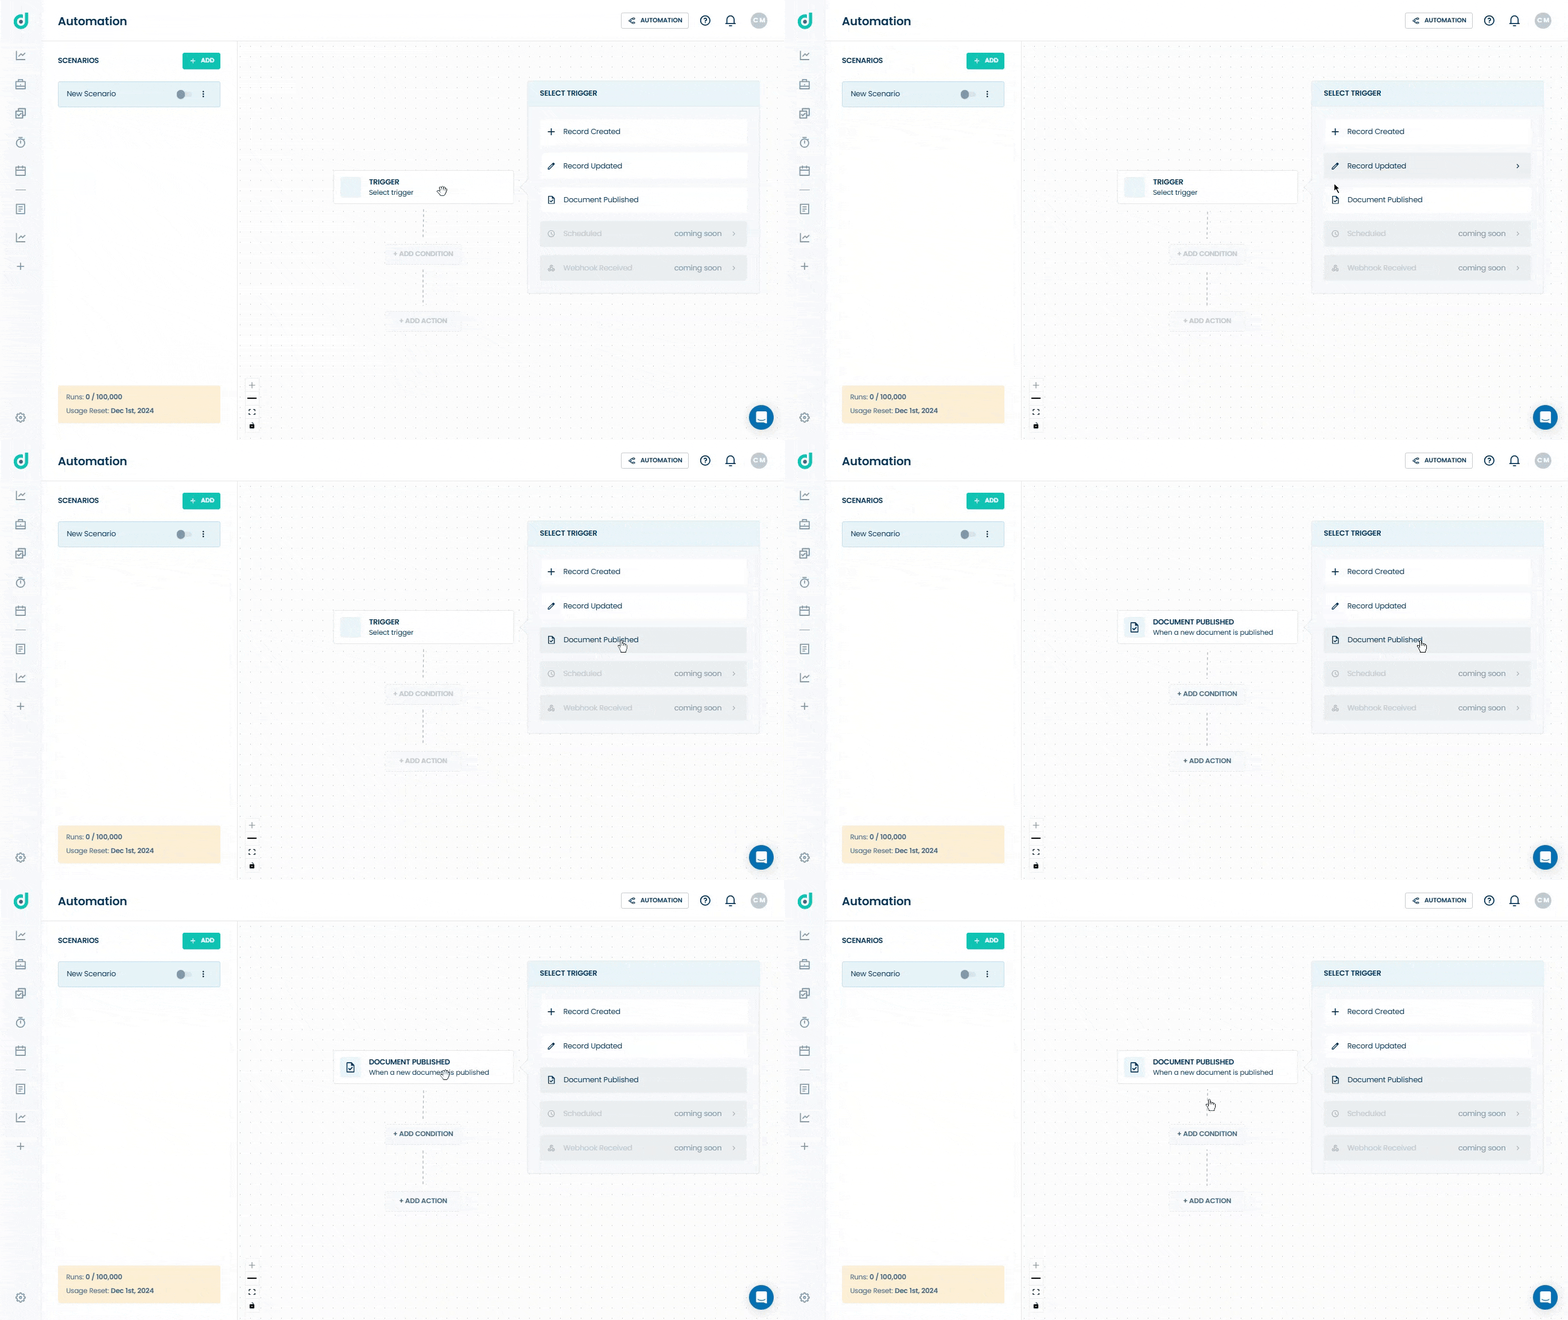
The trigger activates automatically whenever a document is published.
Select the Document Published option as your trigger.
Set Conditions
After selecting the trigger, you can specify conditions that determine whether the actions associated with the trigger should execute.
Step 1: Click on the ADD CONDITION button.
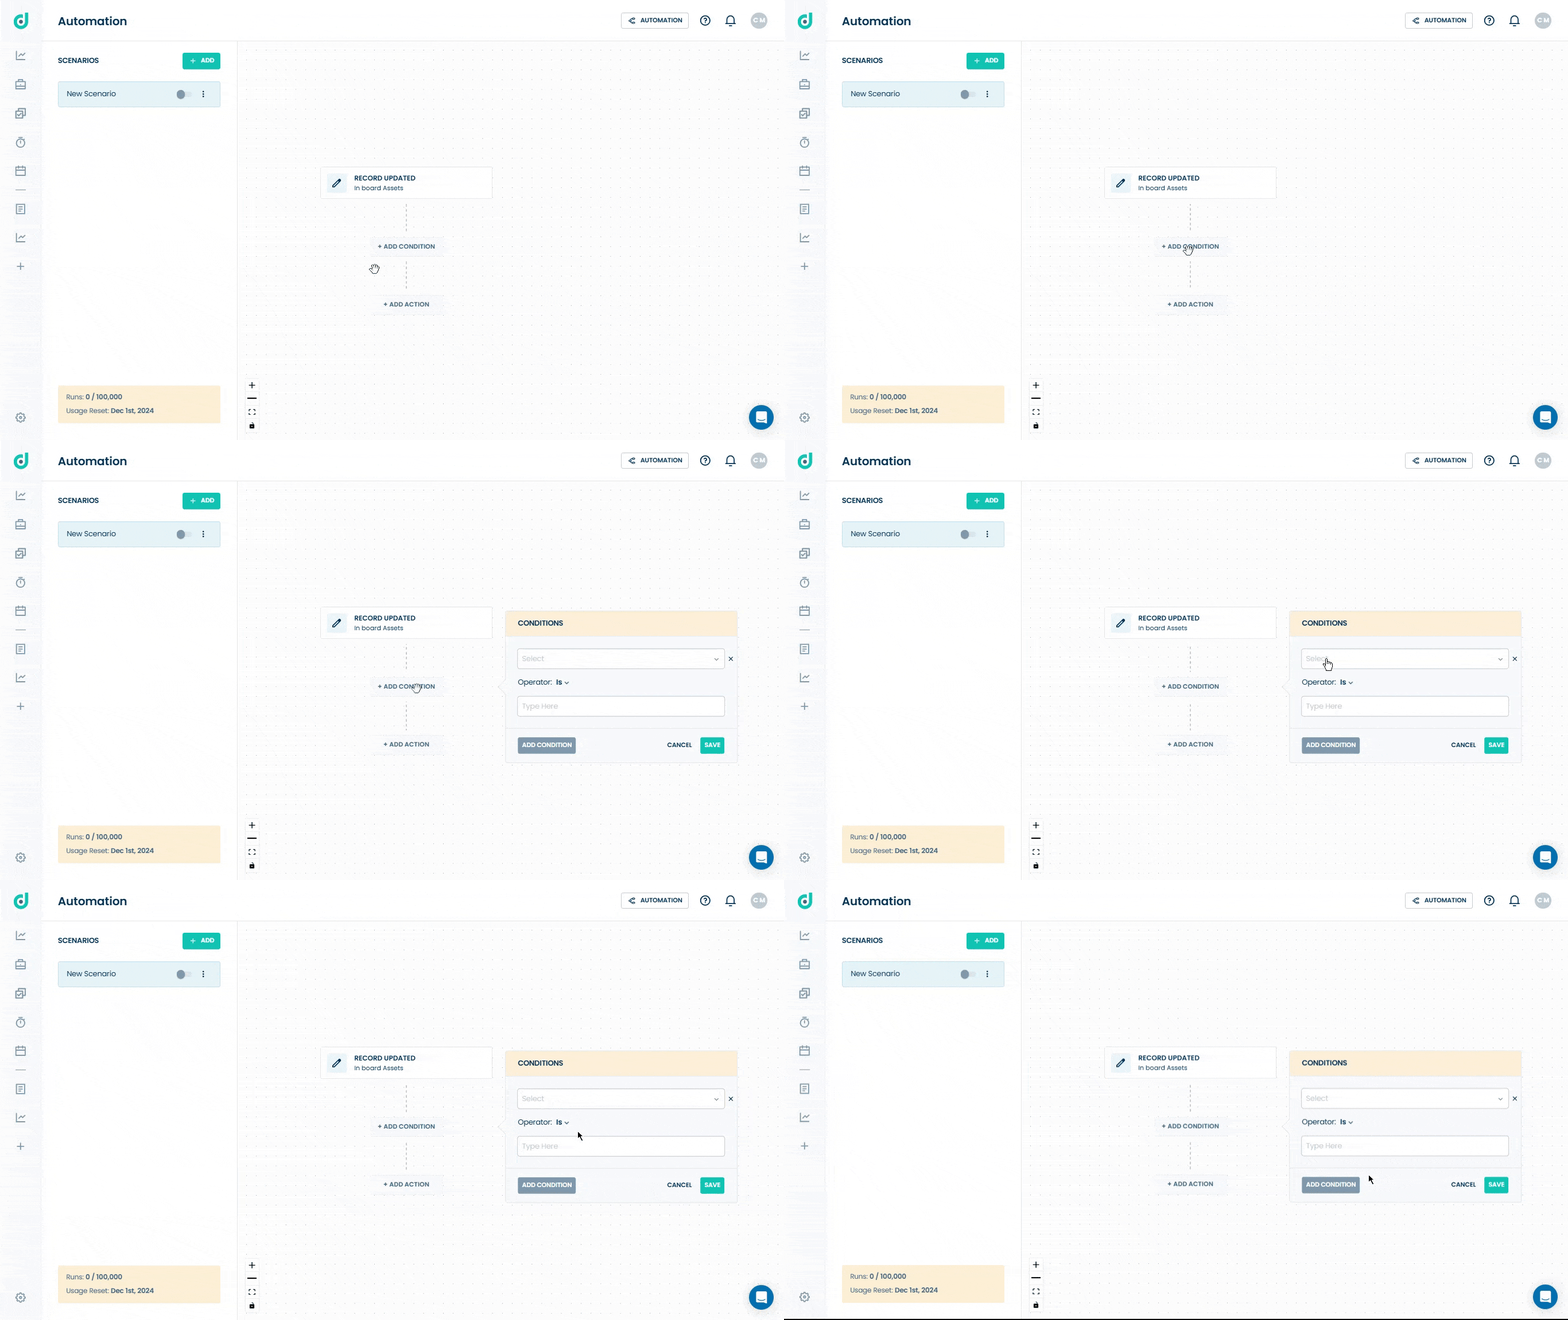
Conditions for automation are defined using the following 2 operators (explained below) that determine how comparisons are made between field values and specified triggers.
Operator 1: “Is”
This operator allows you to check if the value in a selected field matches a specified value exactly. This is useful when you want to ensure that a field contains a specific value before proceeding with subsequent actions in your automation.
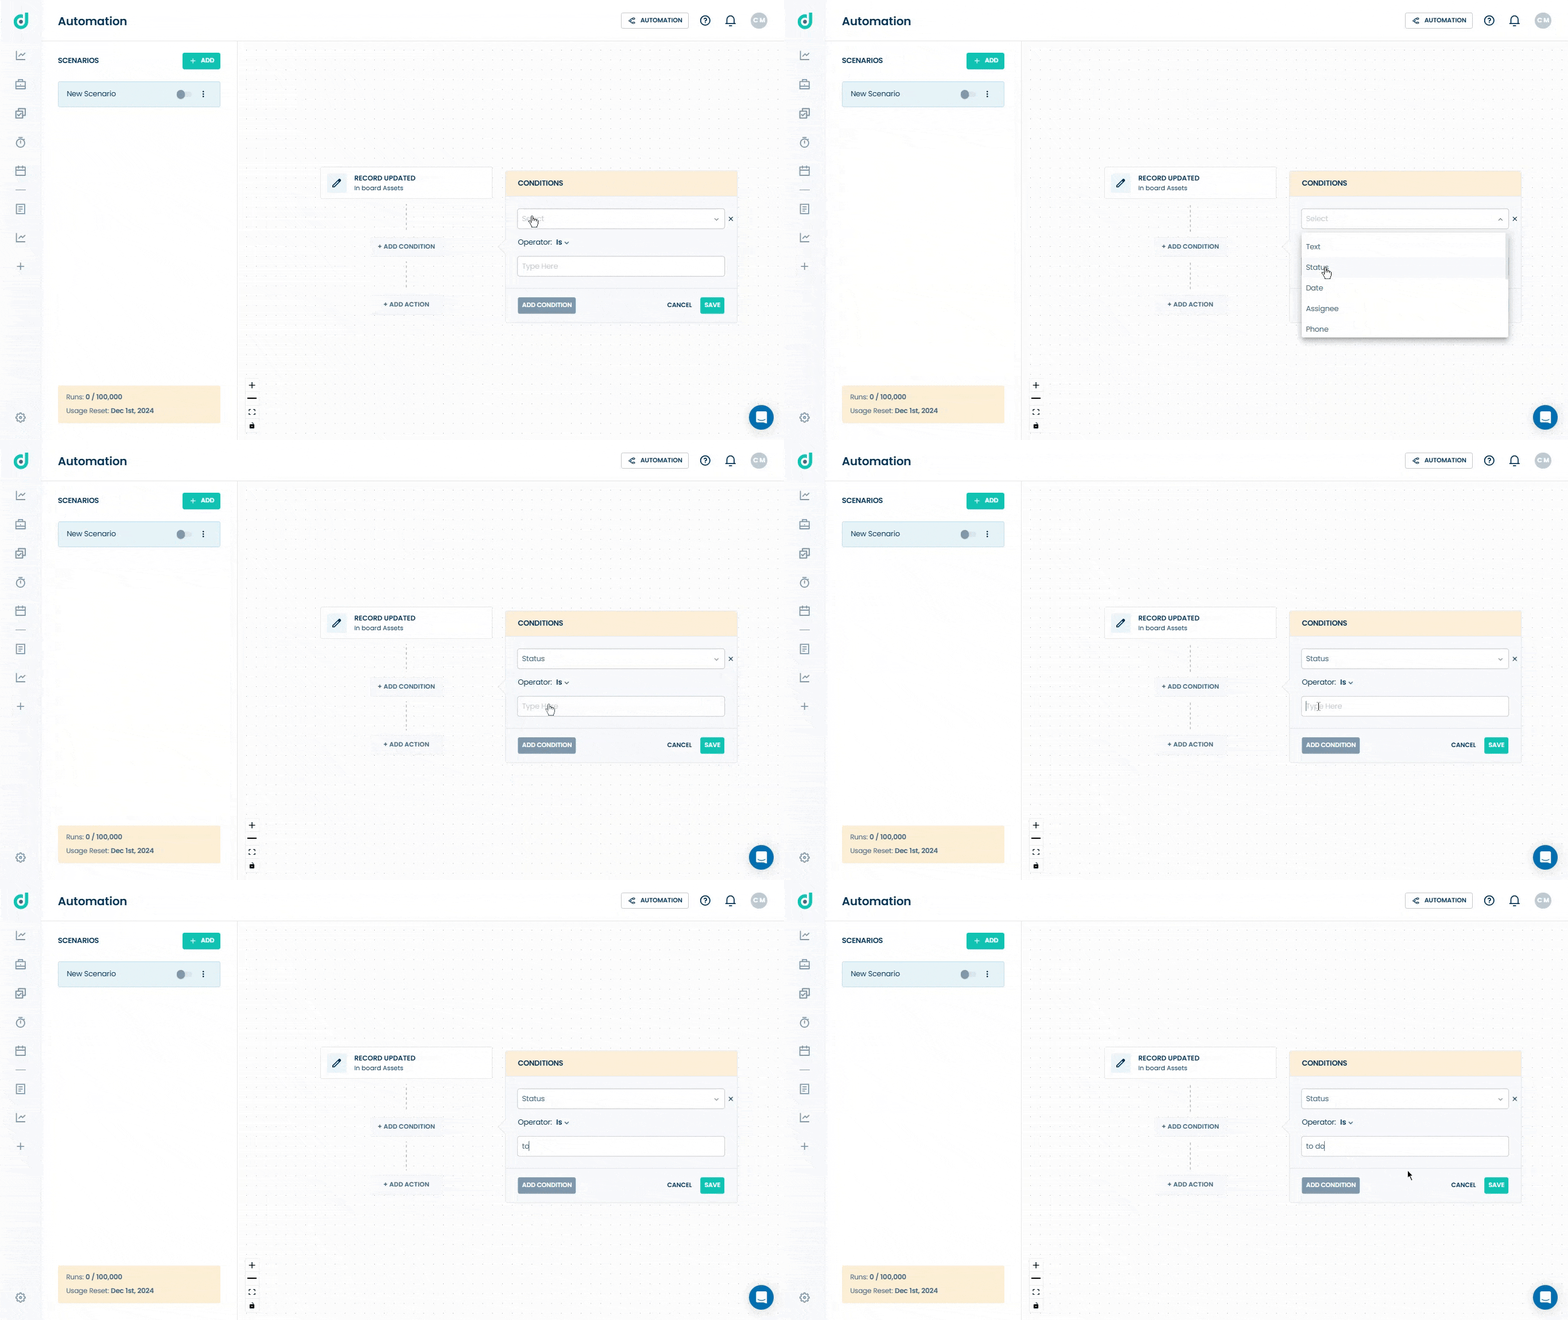
Step 2: Select the preferred field, ensure the operator is set to "Is" and input the required value. For example, the "Status" field is selected here, the operator sets it to "Is", and inputs "To do" to trigger the automation when the "Status" equals "To do".
Operator 2: “Is not”
This operator checks if the value in a selected field does not match the specified value. This is beneficial when you exclude certain records from triggering actions based on specific criteria.
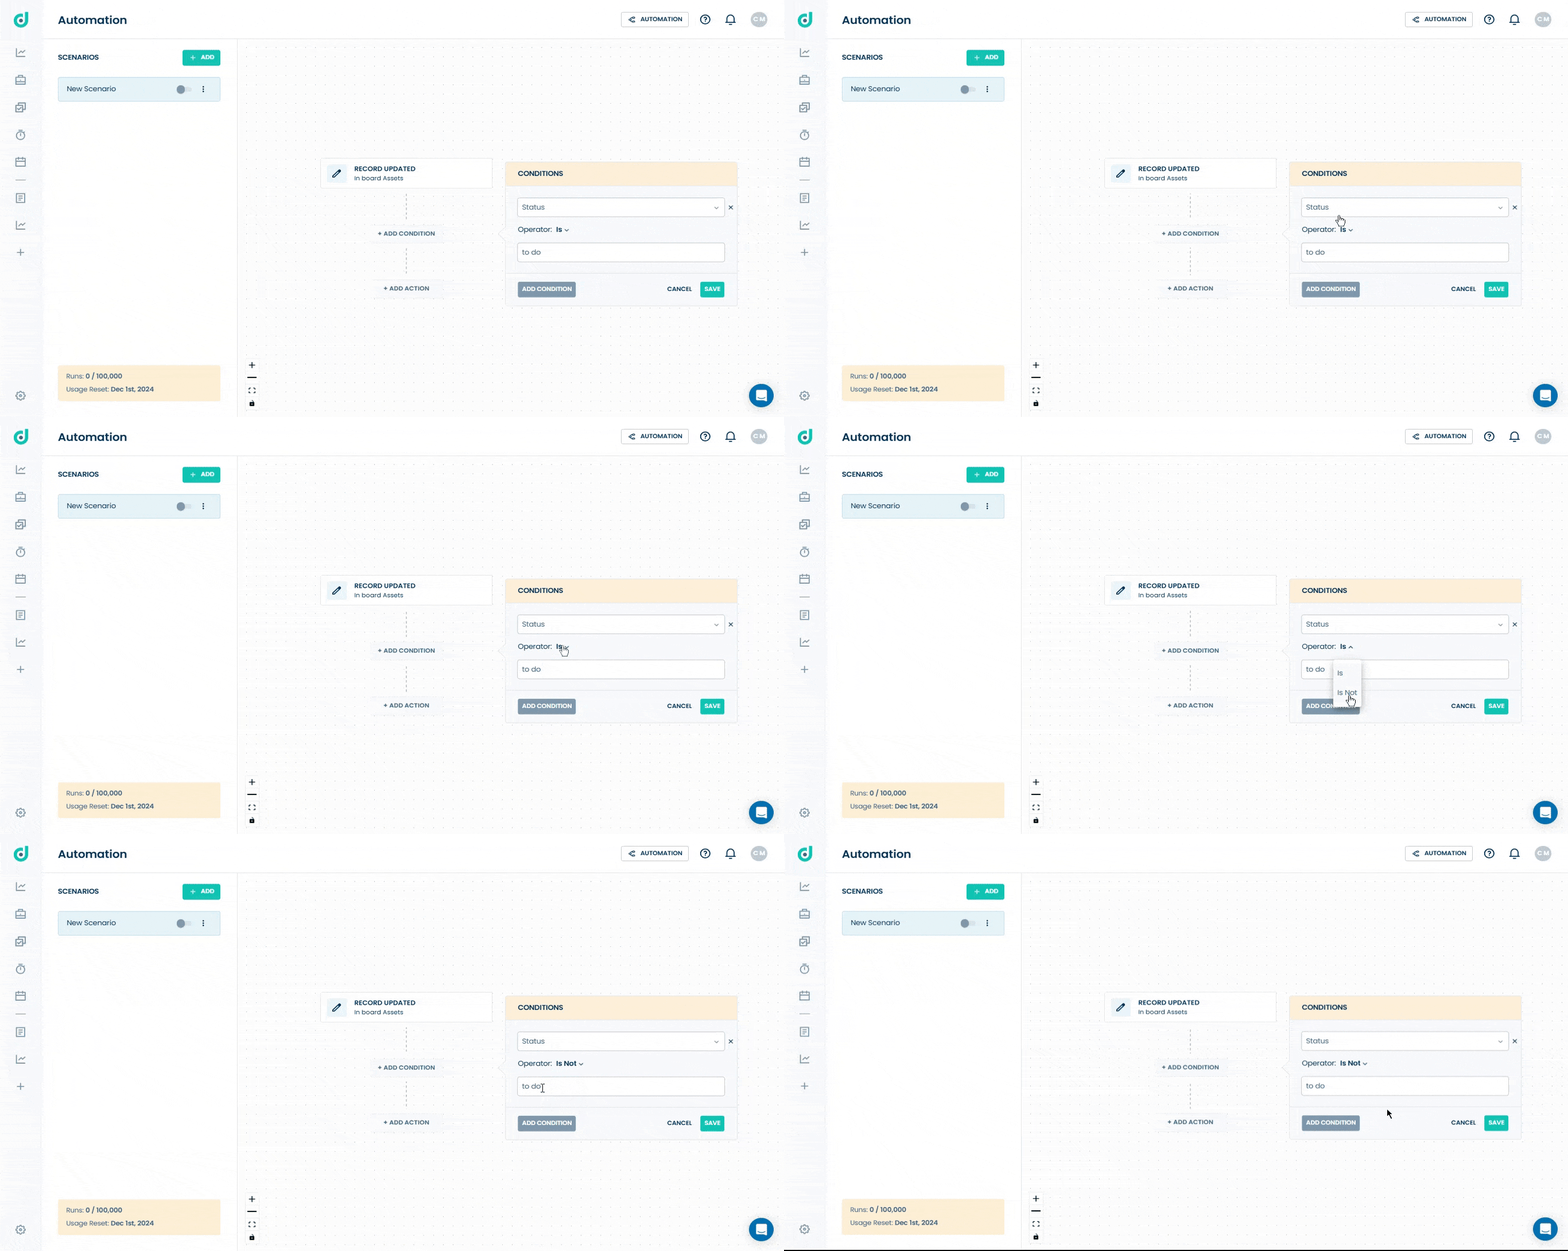
Step 2: Select the preferred field, ensure the operator is set to "Is not" and input the required value. For example, if the "Status" field is selected here, the operator sets it to "Is not", and inputs "To do" to trigger the automation when the "Status" does not equal "To do".
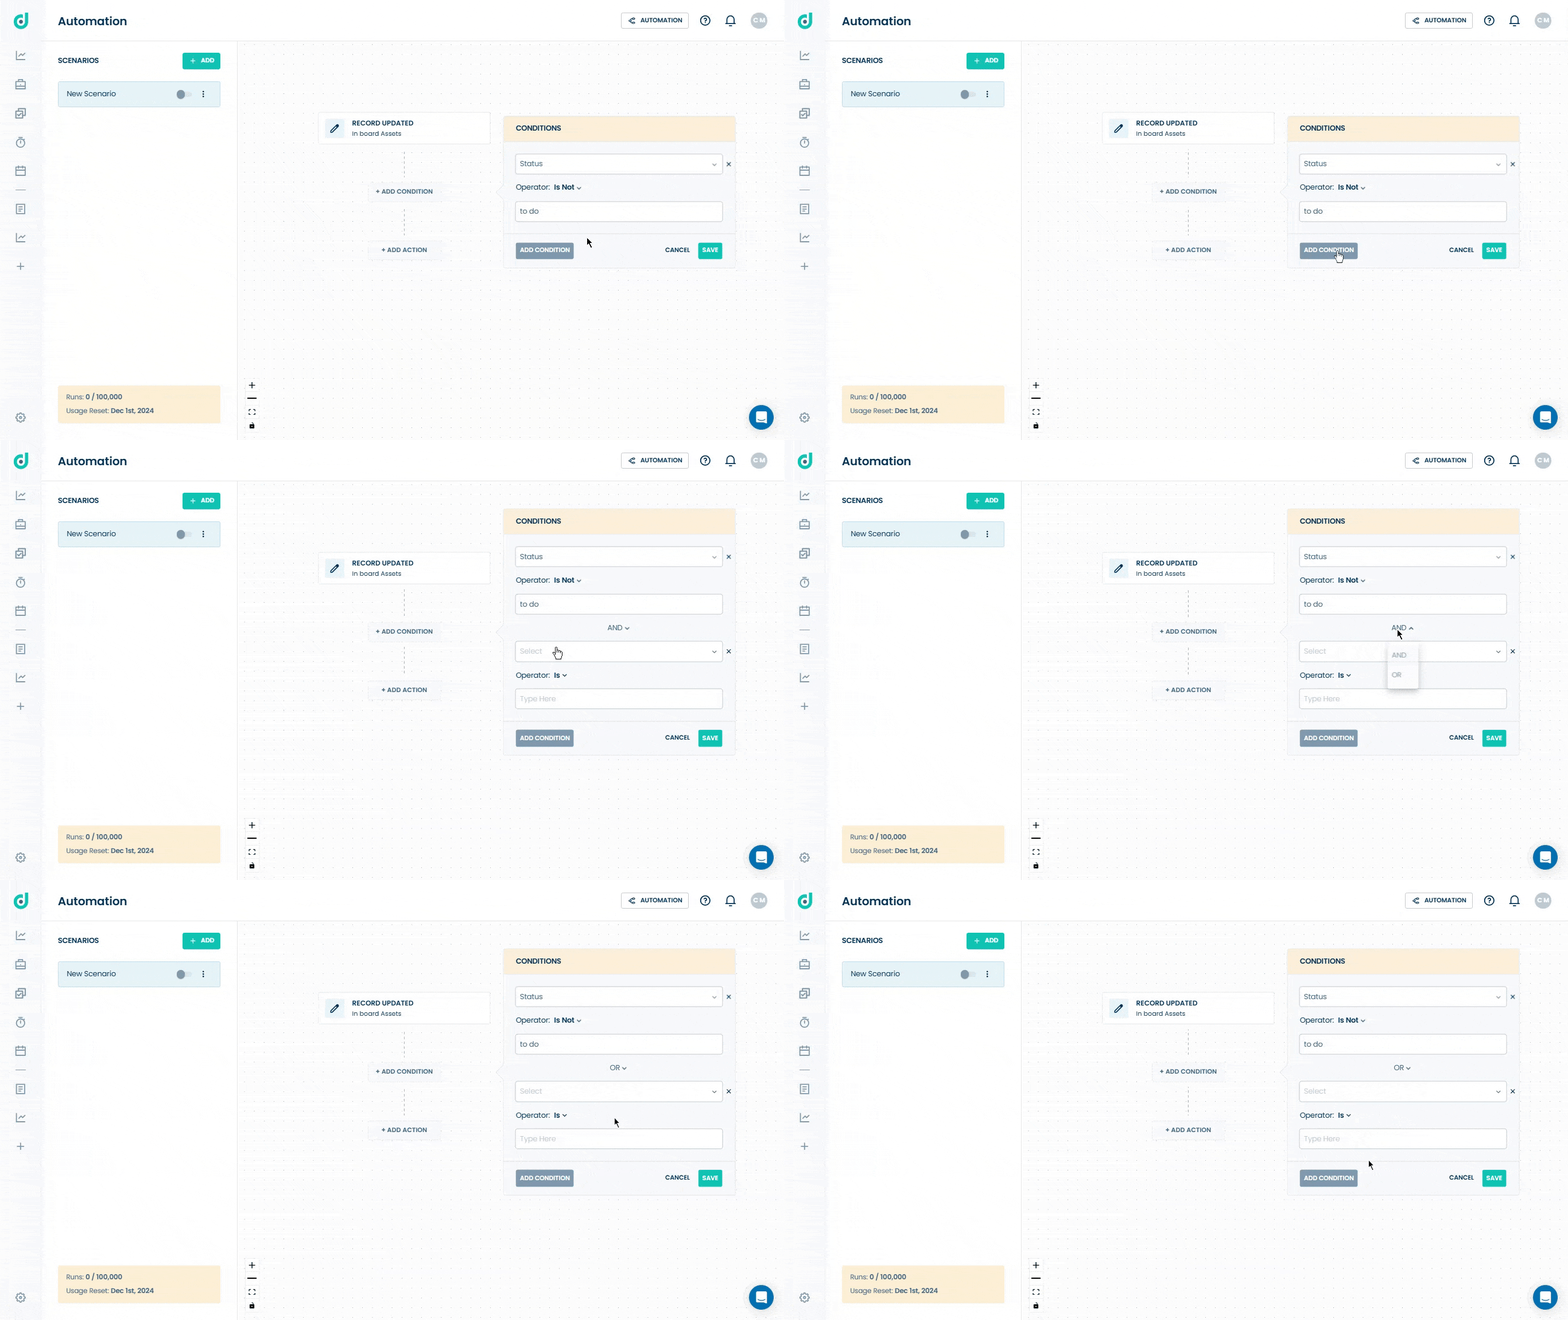
Note: You can add multiple conditions to your workflow to define how the automation operates, using other logical operators like AND and OR.
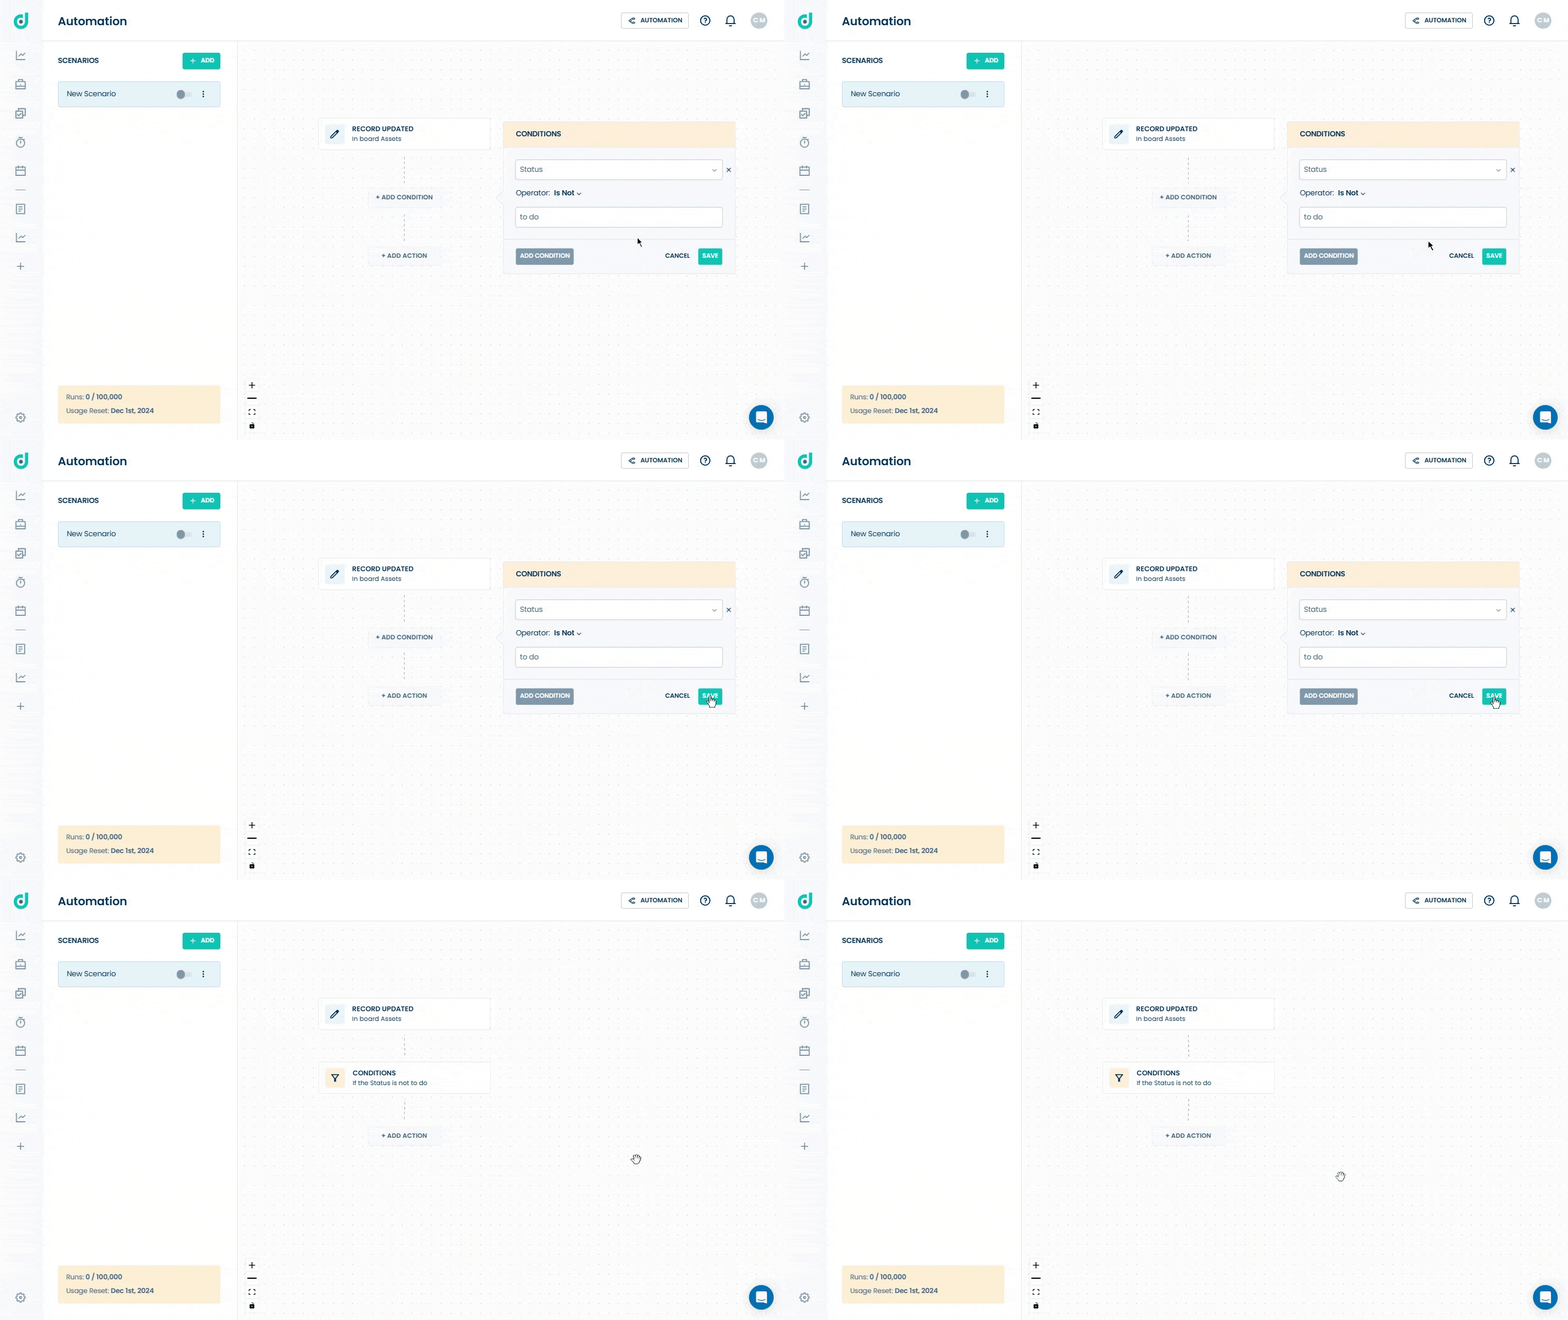
Step 3: Once done, click on the Save button.
Select Actions
When the trigger is fired and the specified conditions are met, you can define a series of actions that should occur as part of the automation workflow. This includes the following actions:
- Create Record
- Update Record
- Sent Mail
- Notify User
- HTTP Request
Note: In all actions, the data from the trigger will be available to use in the action inputs along with custom text. In each field, you can select data from the trigger, static data from the board, or write text.
Create Record
Allows you to create a new record in a selected board automatically. For example, adding a new lead to the "Leads" board can trigger the creation of a corresponding record in the "Contacts" board to sync information.
Step 1: Click on Add Actions and select the Create record option.
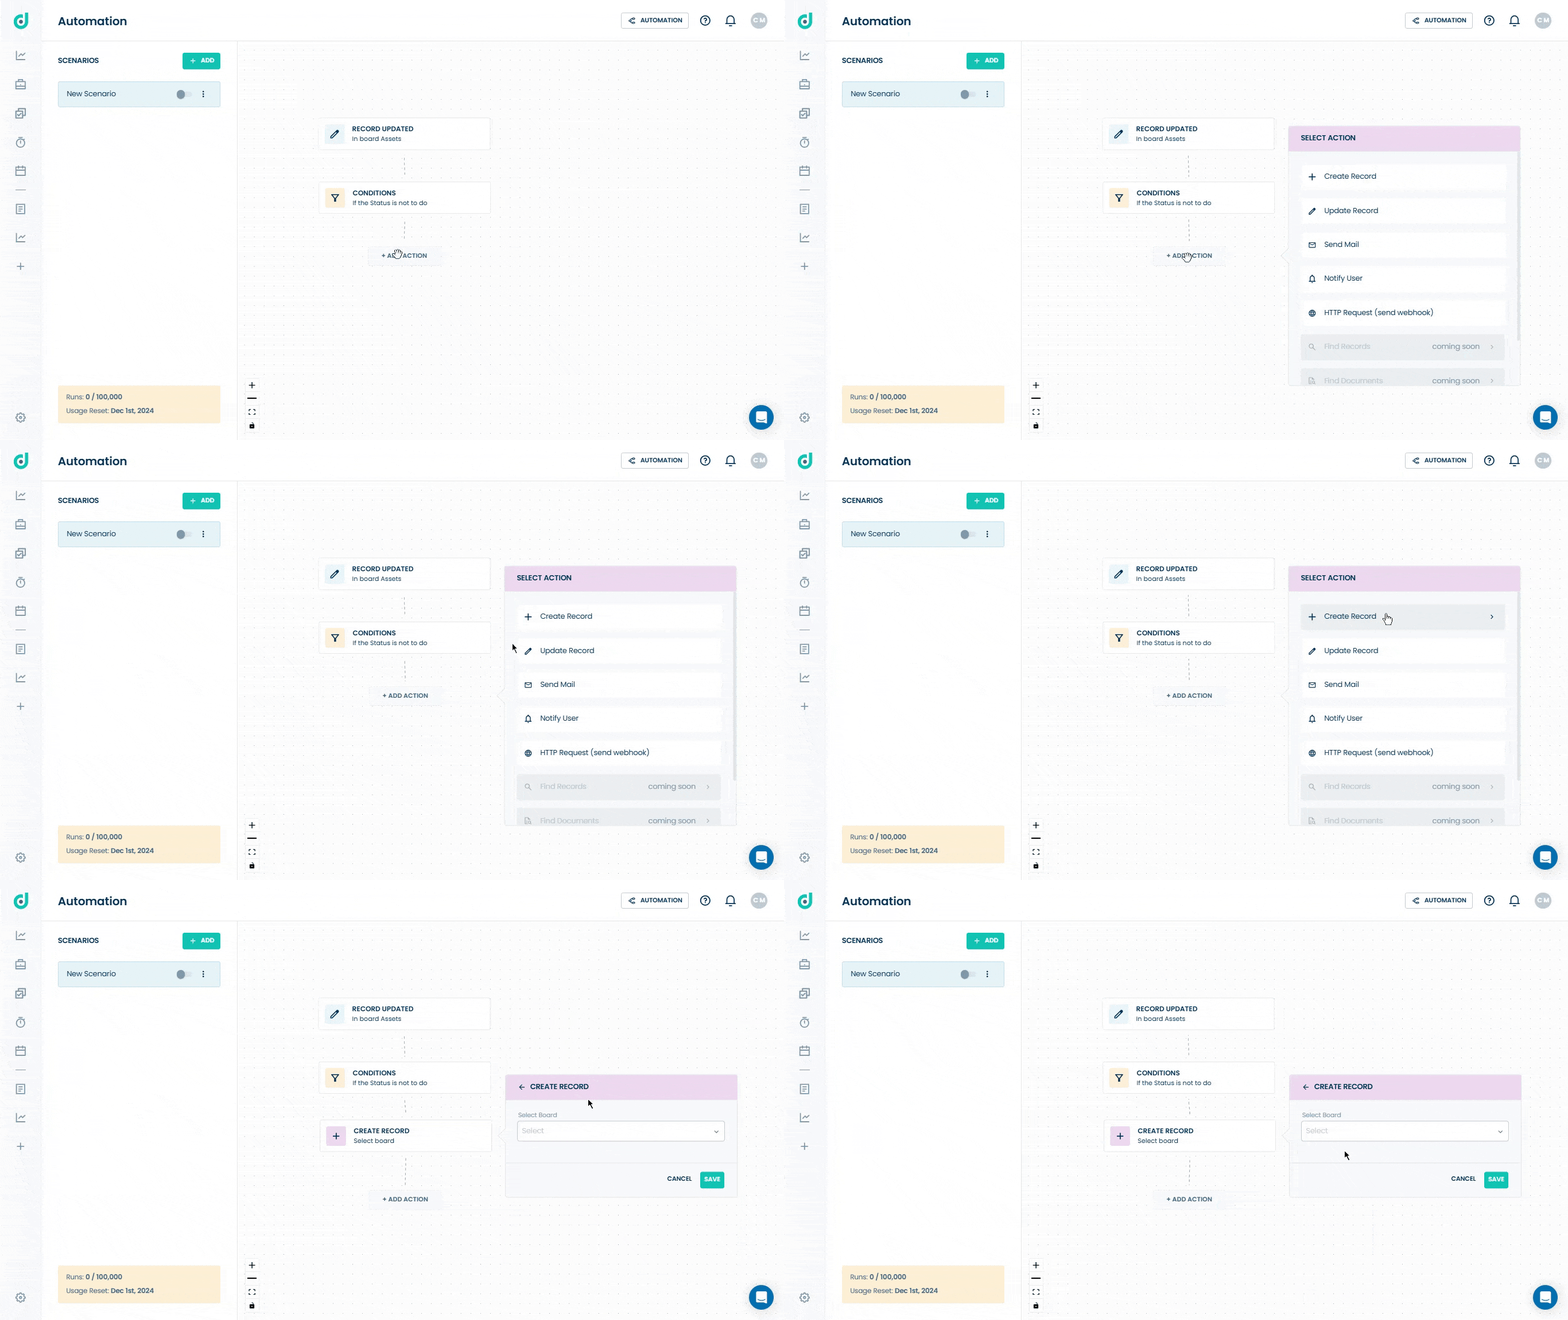
Step 2: Select a board and input the details on the following fields for the record to be created.
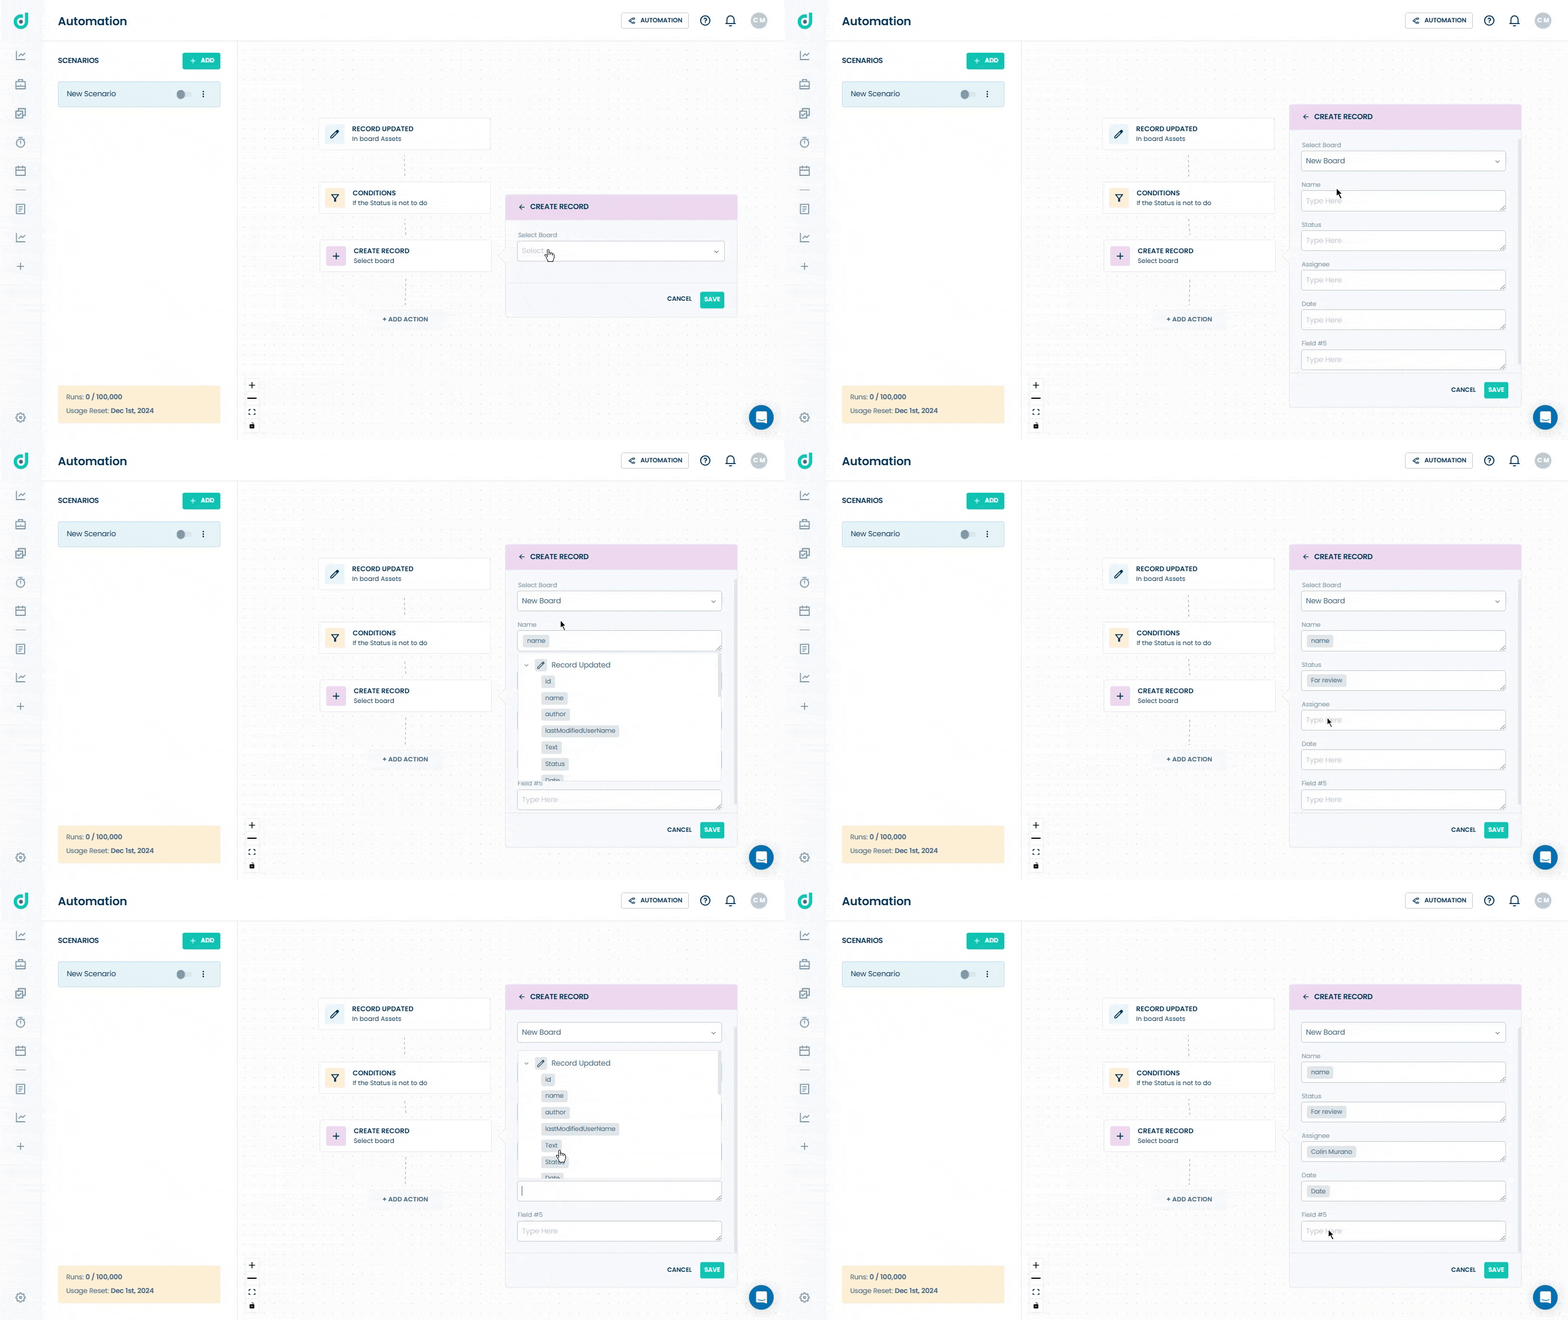
Update Record
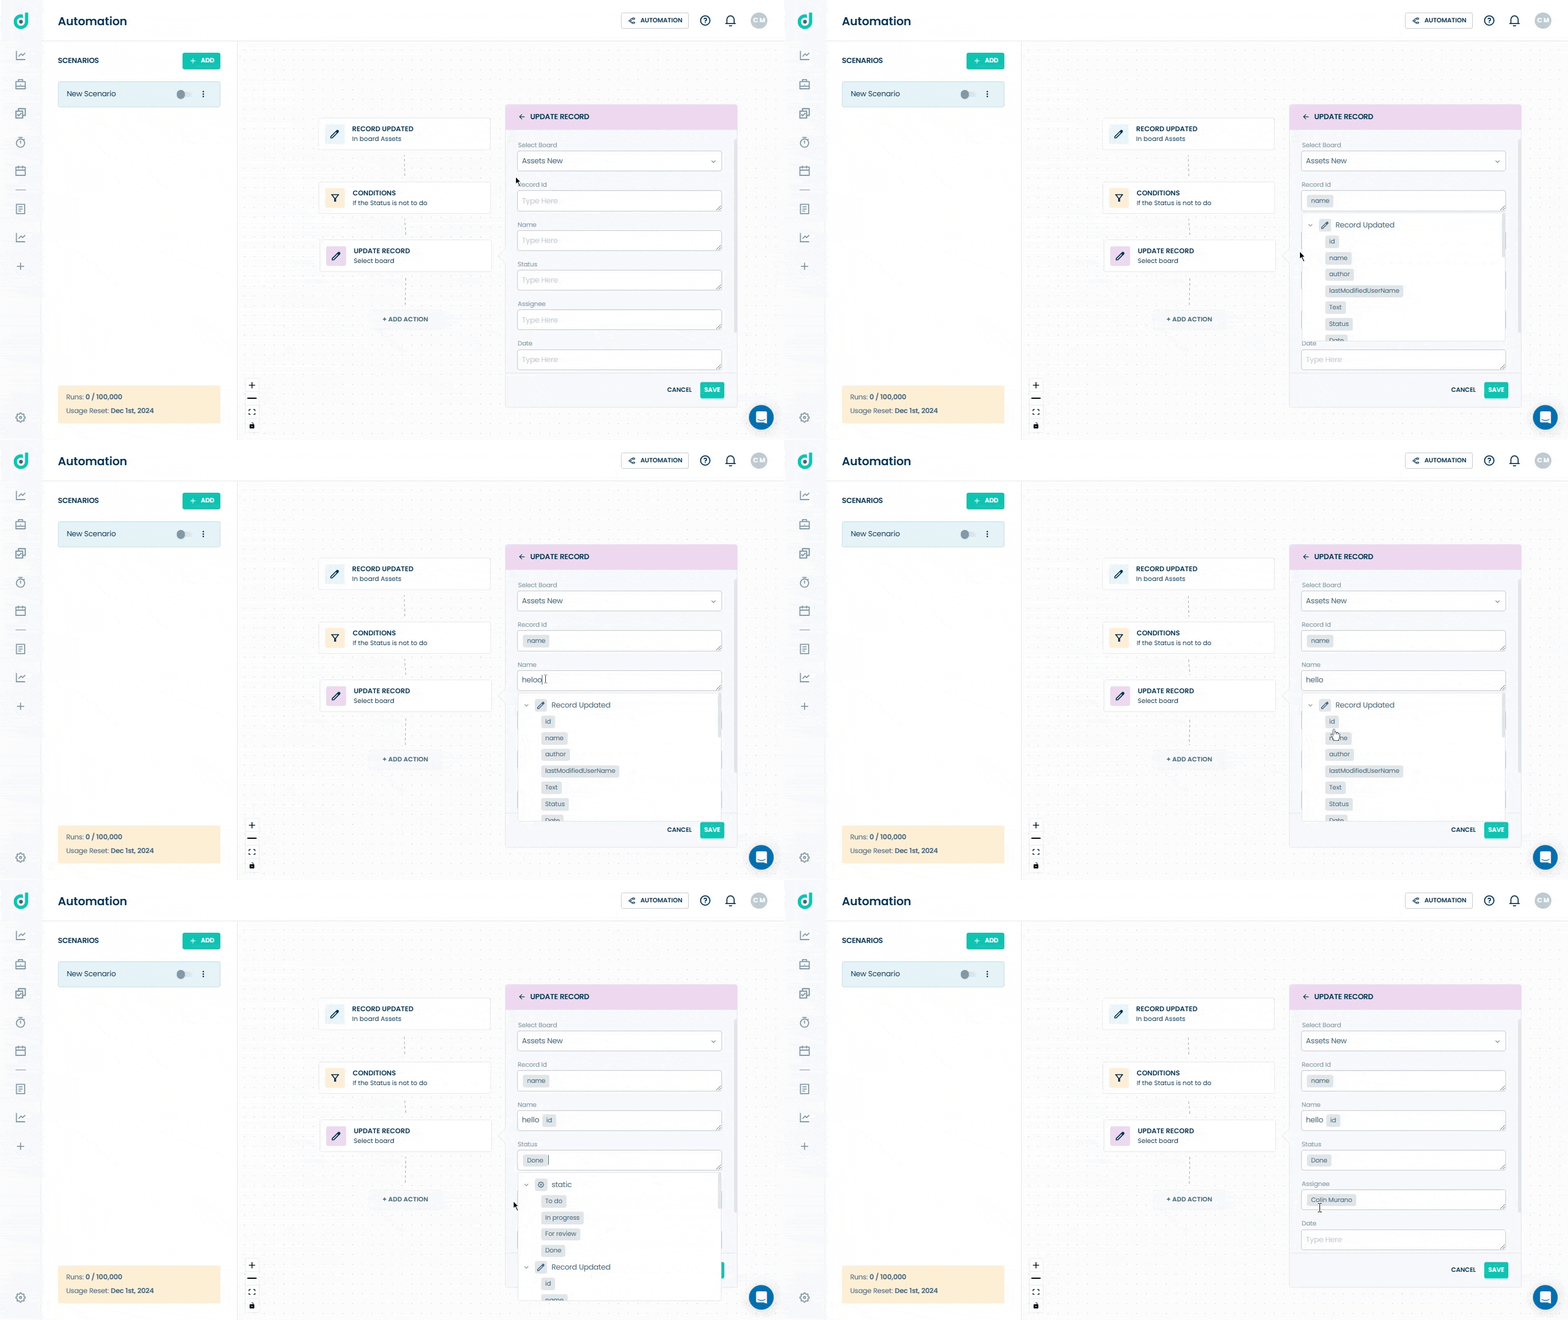
Allows you to modify fields in existing records.
Note: You must select the specific record ID that you want to update.
Send Mail
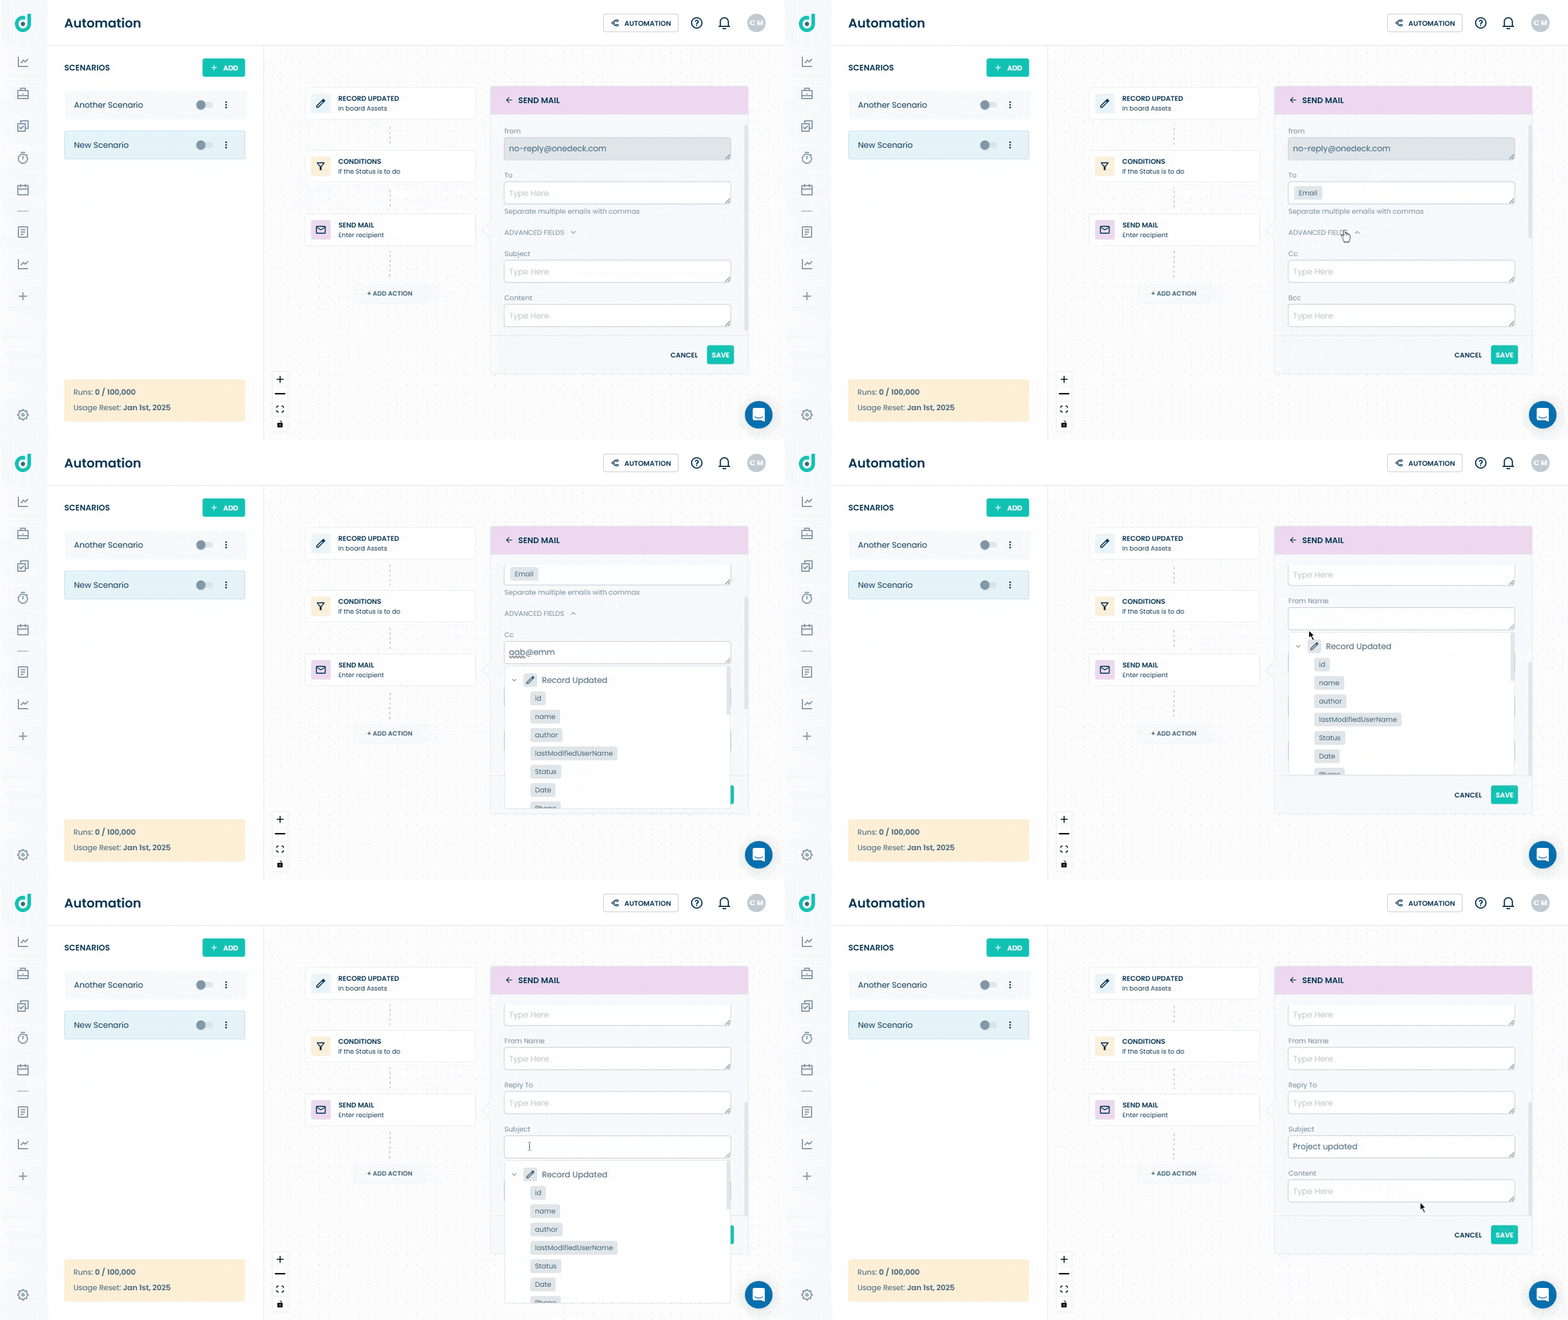
Allows you to automate the process of sending emails to users based on specific triggers within the application.
Select the Sent Mail option and input the details in the following fields:
| Fields | Description |
| From | The email will be sent from the address [email protected]. |
| To | Recipients can be added here (multiple emails can be added using commas). |
| Advanced Fields |
Cc: For adding carbon copy recipients. Bcc: For adding blind carbon copy recipients. From Name: Specifies the sender's display name. Reply To: Email address for replies. |
| Subject | The email subject line. |
| Content | The body text of the email. |
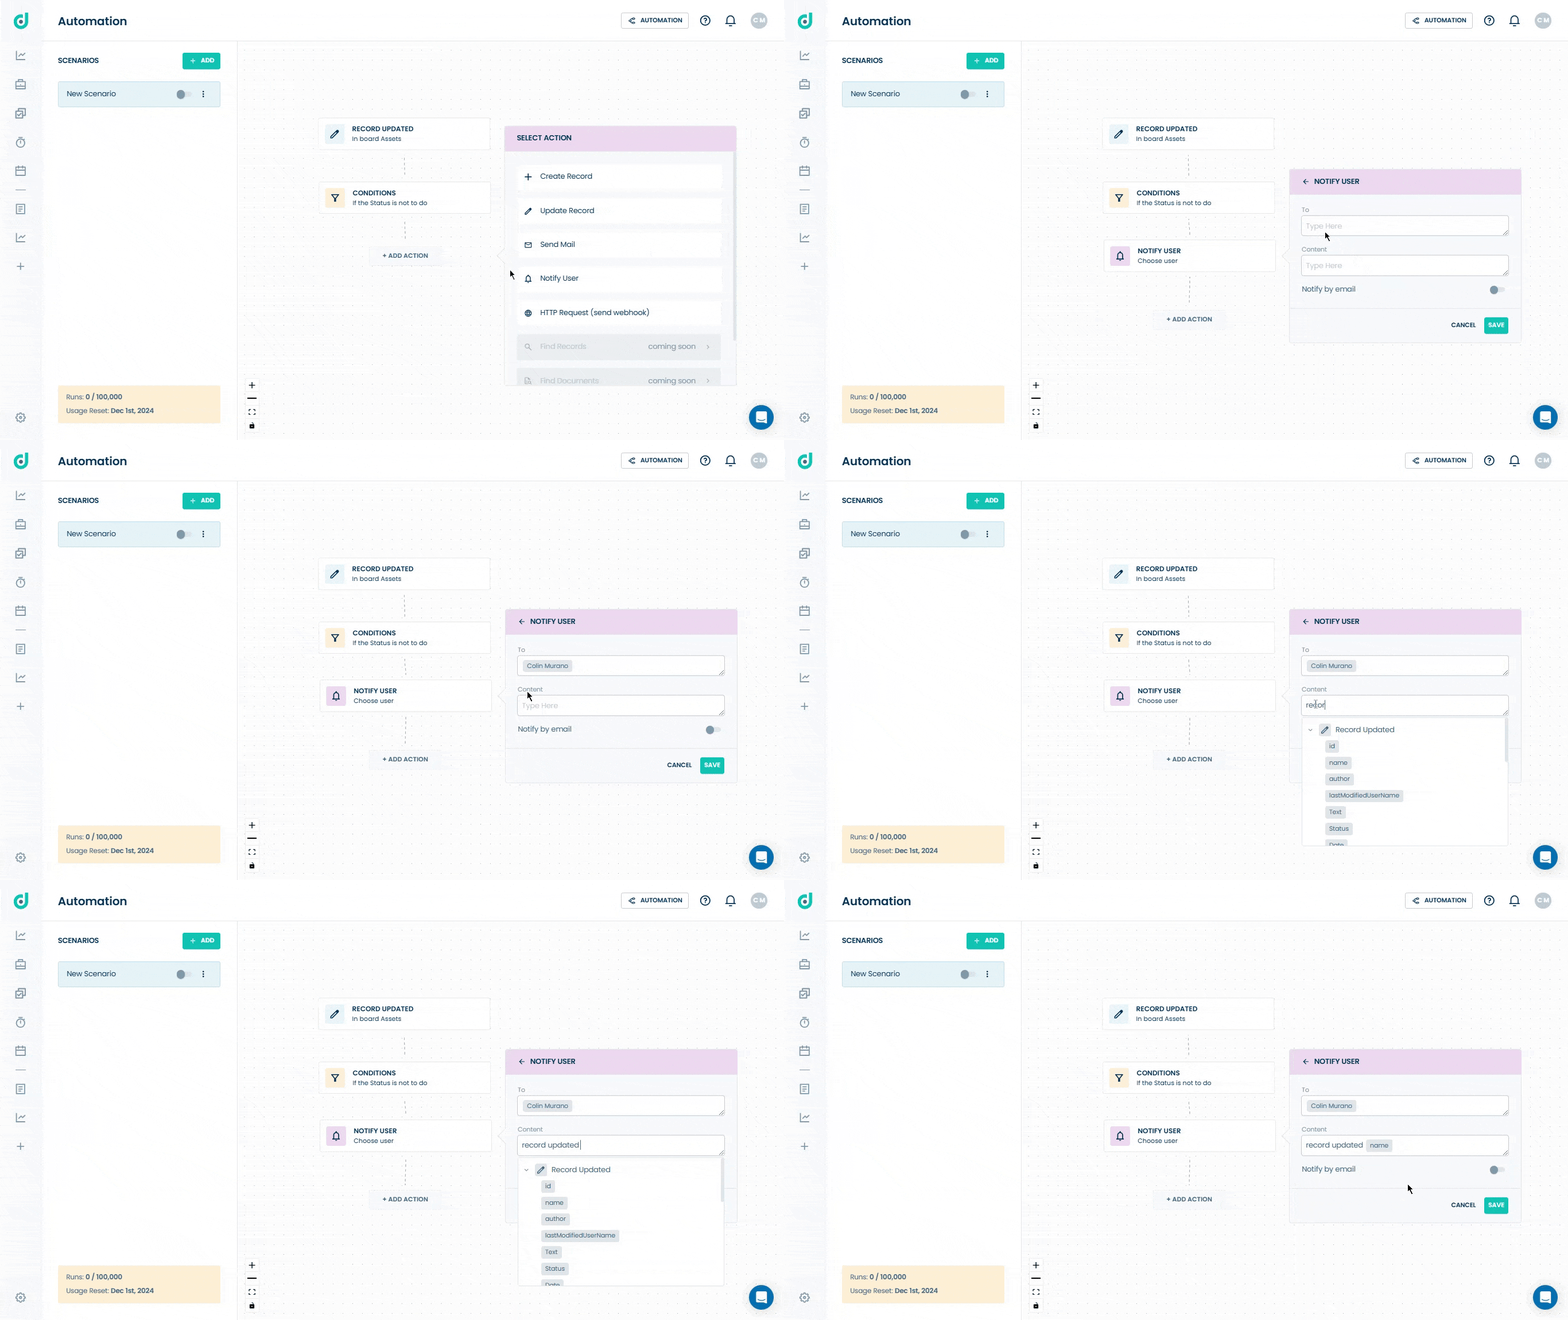
Notify User
Allows you to send in-app, push notifications to specific team members when a particular trigger occurs.
Select the Notify User option and input the details in the following fields:
| Fields | Description |
| To | Specifies the user(s) to notify. |
| Content | Custom message content for the notification. |
| Notify by email | An optional toggle to send notifications via email also. |
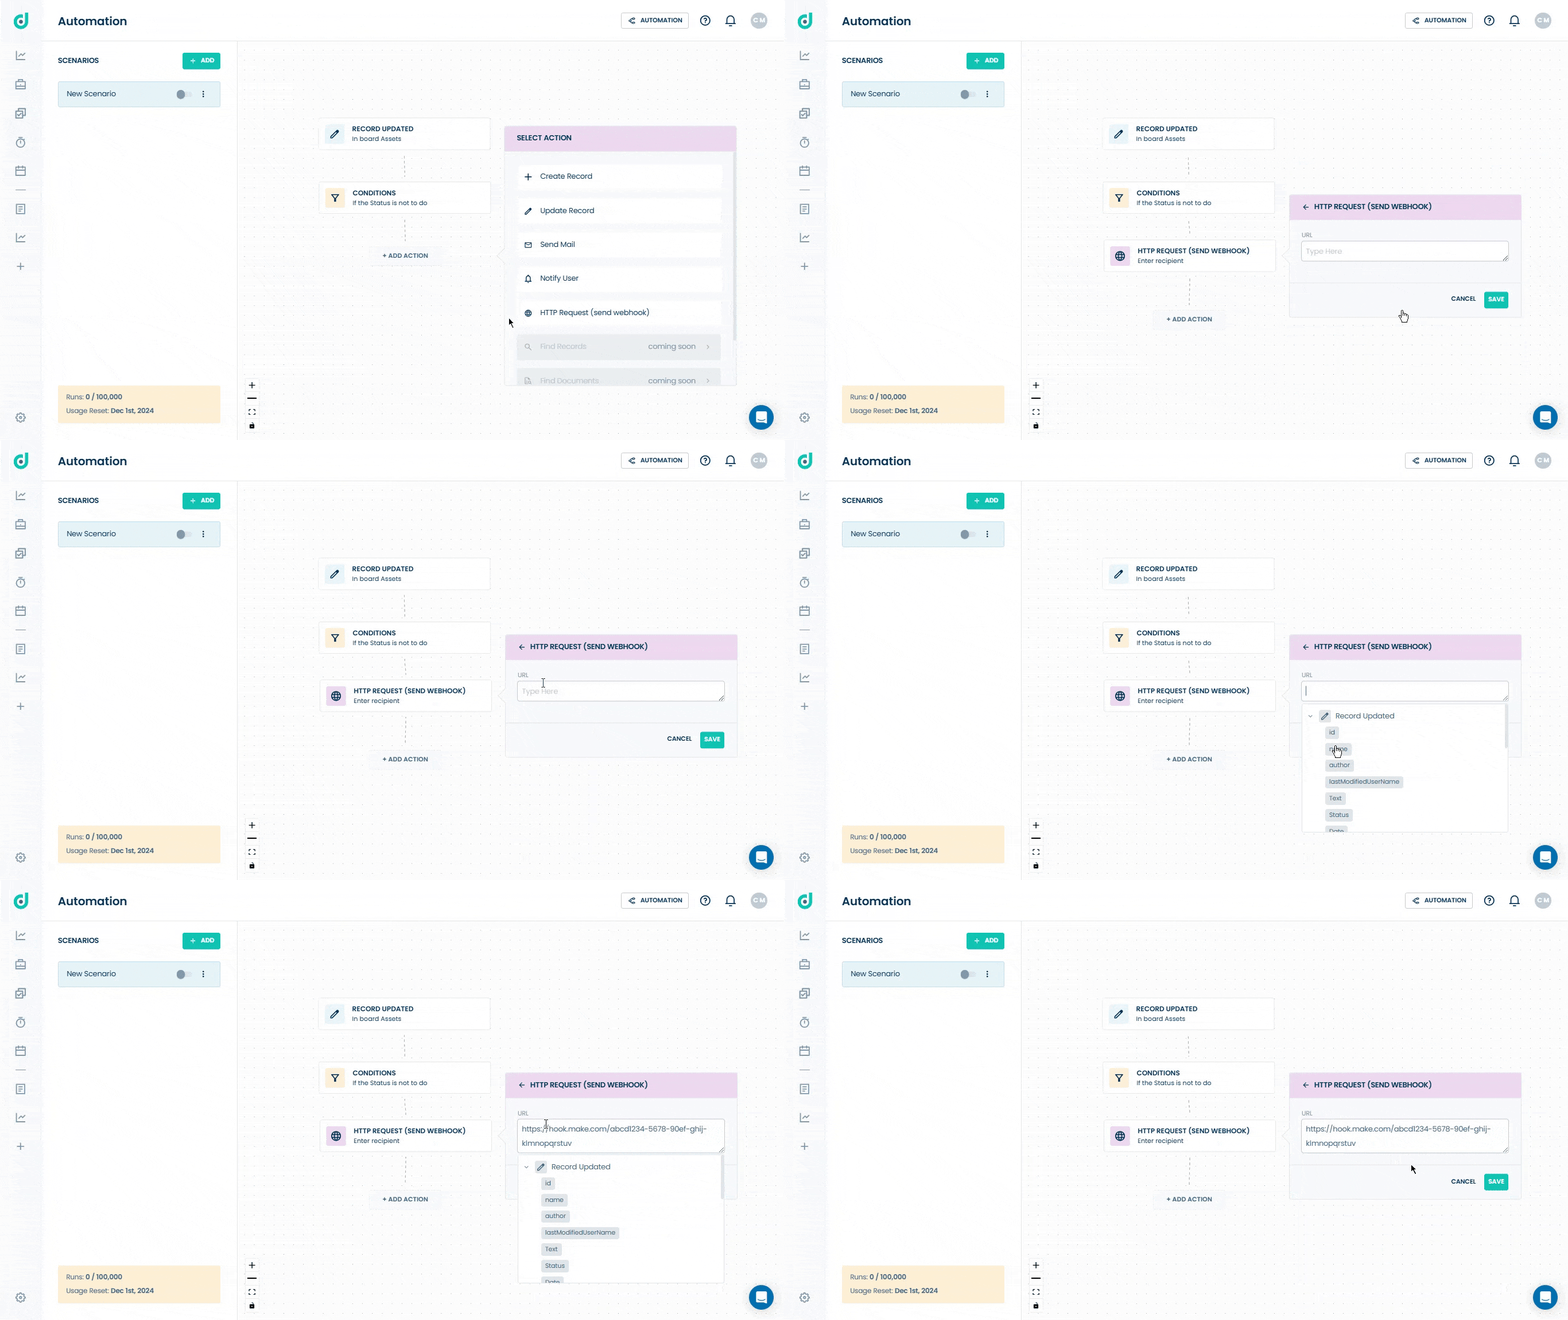
HTTP Request (send webhook)
Allow you to create custom workflows and integrate with various third-party applications such as Zapier and Make and via webhooks.
Note: All data from the trigger will be sent to the webhook in a POST method.
Once a preferred action is added, click on the Save button.
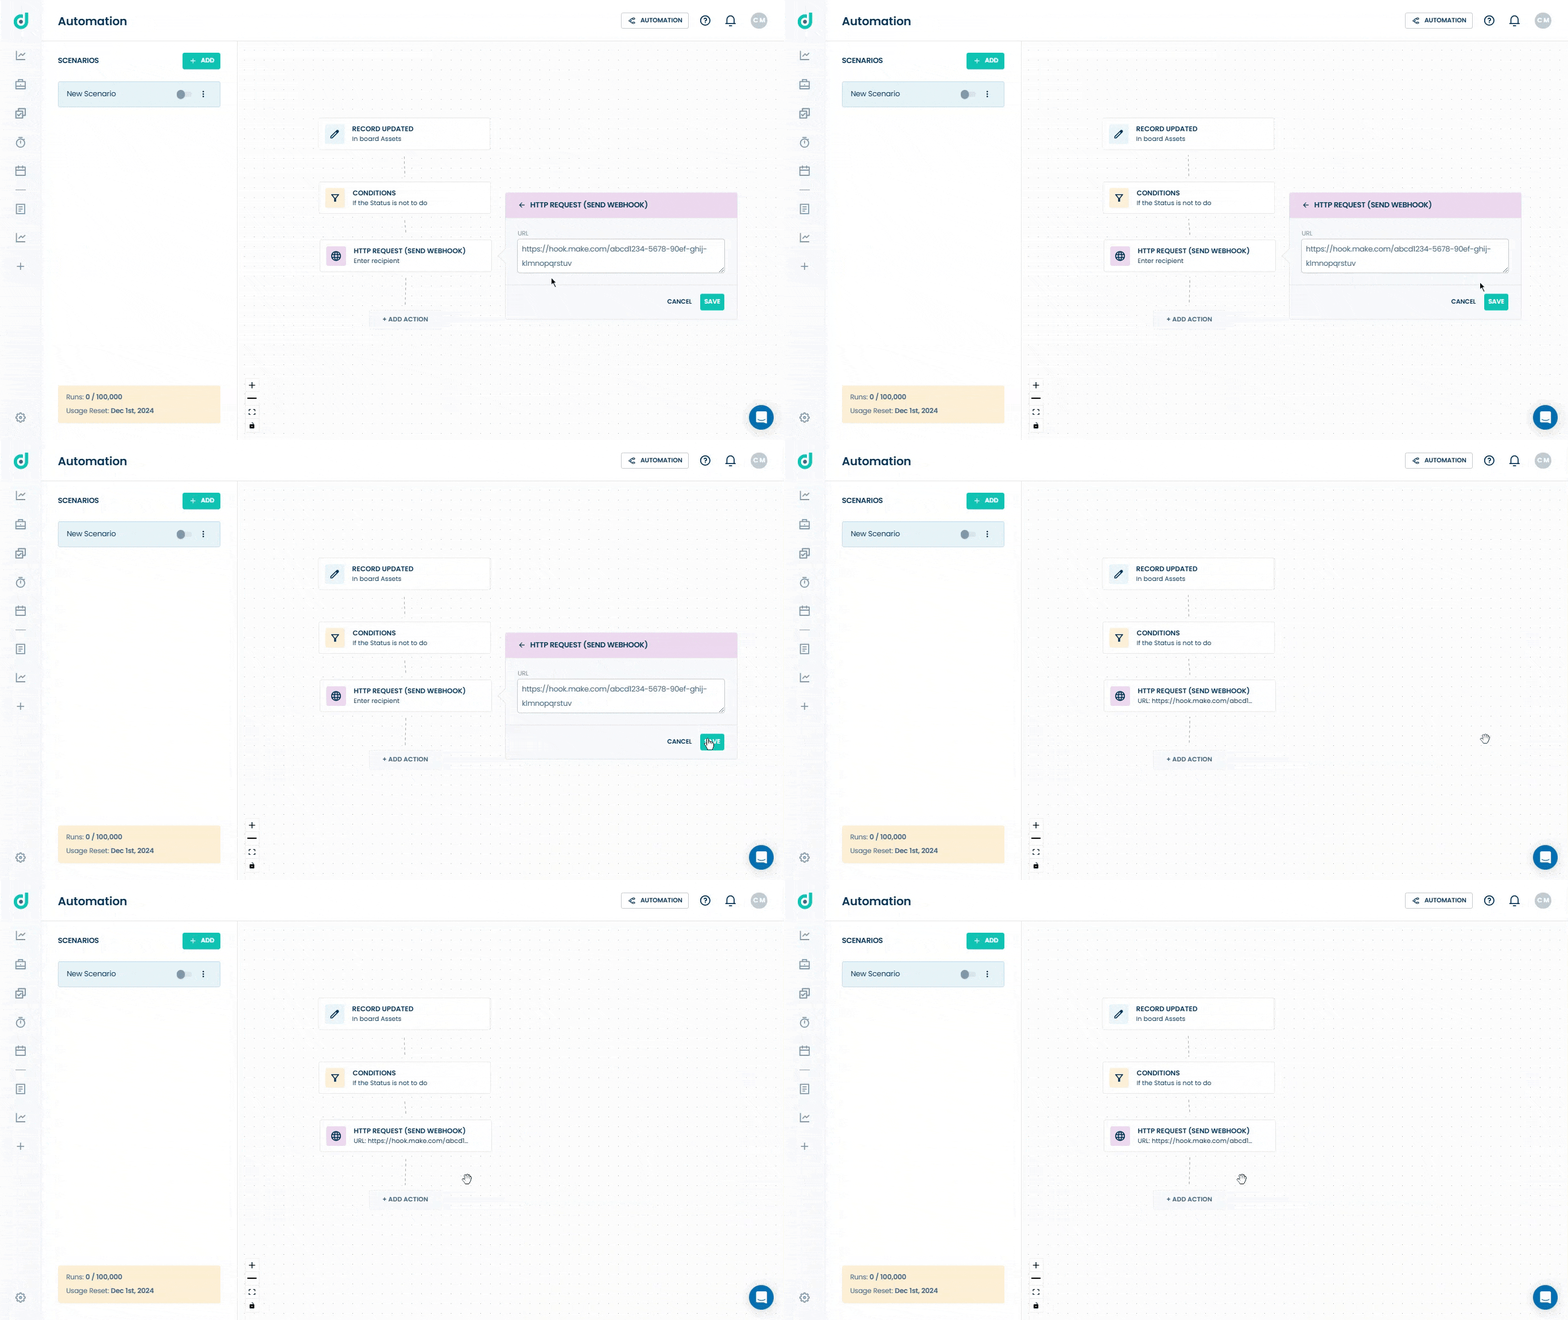
Further, you can also define a sequence of actions that should occur when a specific trigger is activated, enabling comprehensive responses to various scenarios.
Find Record
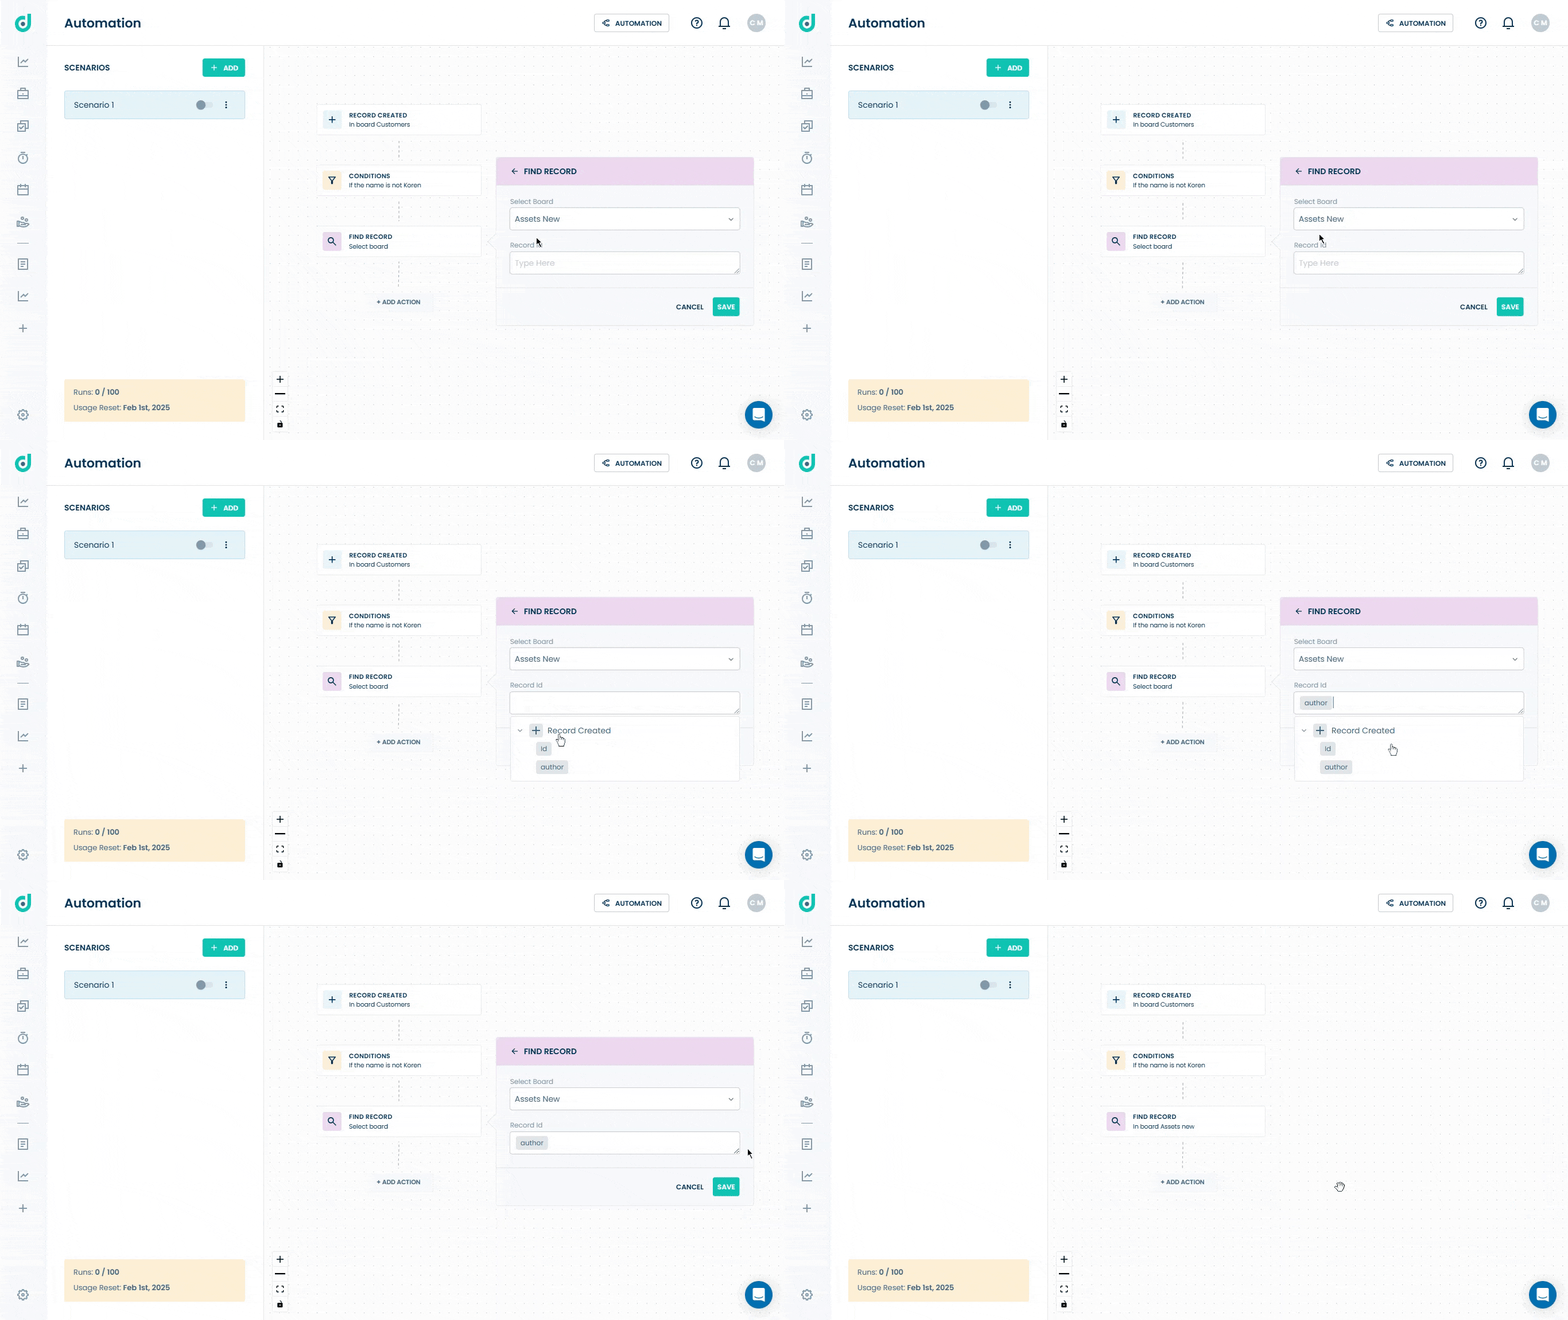
Allows you to search for a specific record within a selected board by its ID. It is used to enrich the data you can use in the scenario.
Step 1: Select the Find Record option and choose which board to search for the record.
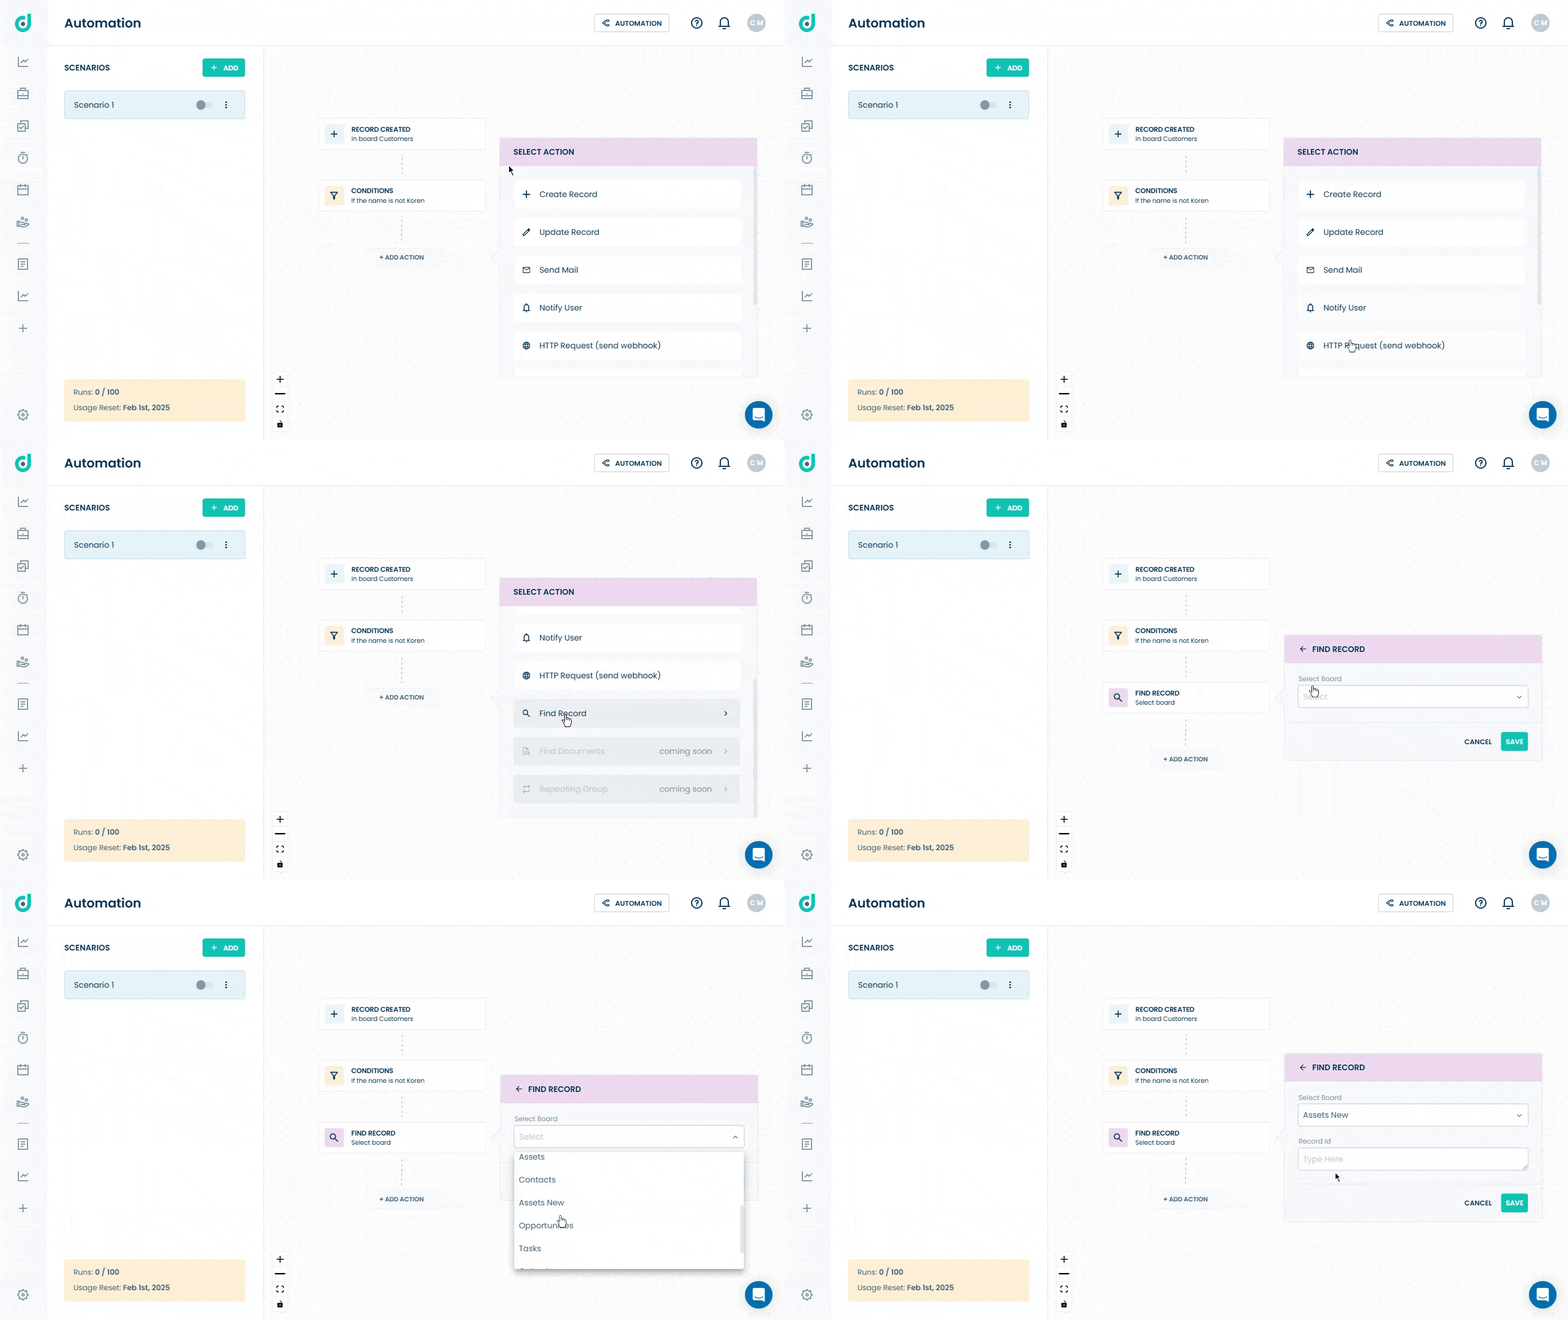
Step 2: Enter the Record ID, then click “Save”.
Managing Scenarios
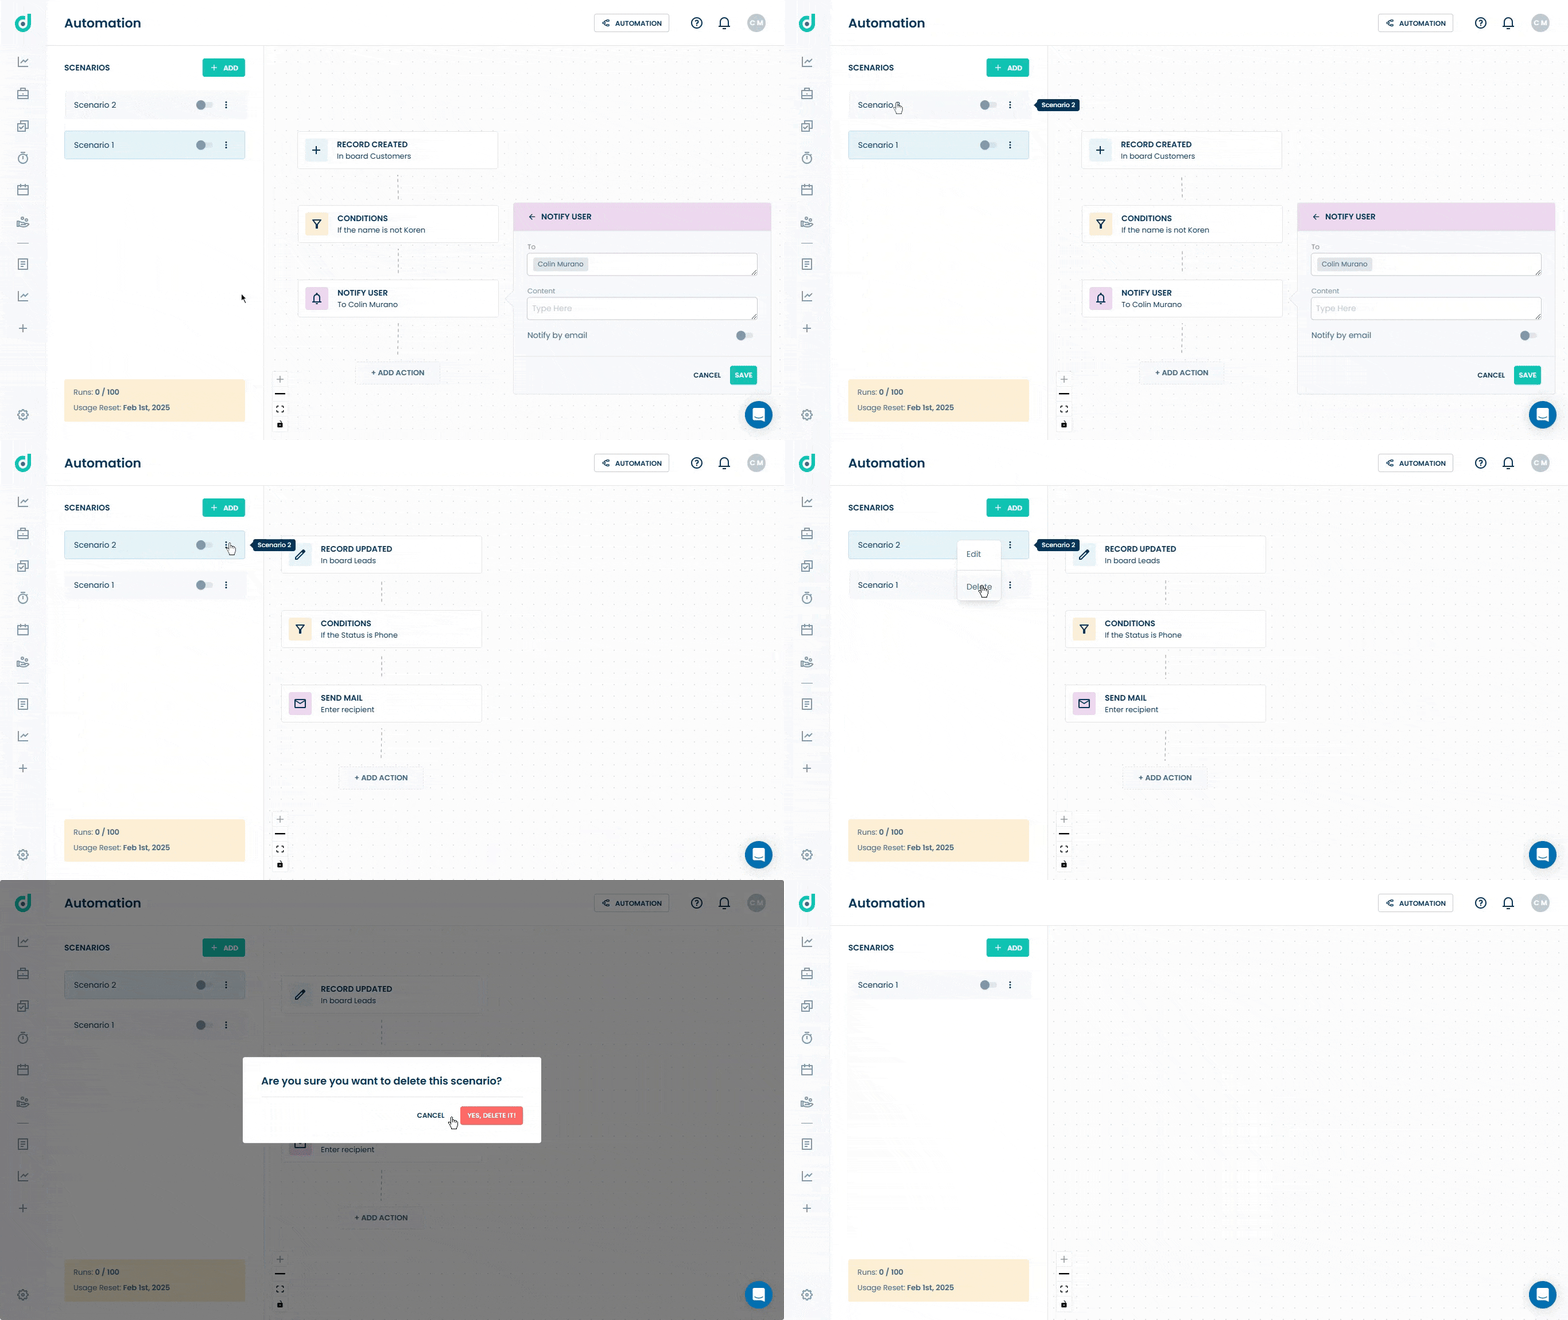
Once a Scenario is created, you can effectively manage that triggered scenario by the following options:
- Modify
- Edit
- Delete
Modify
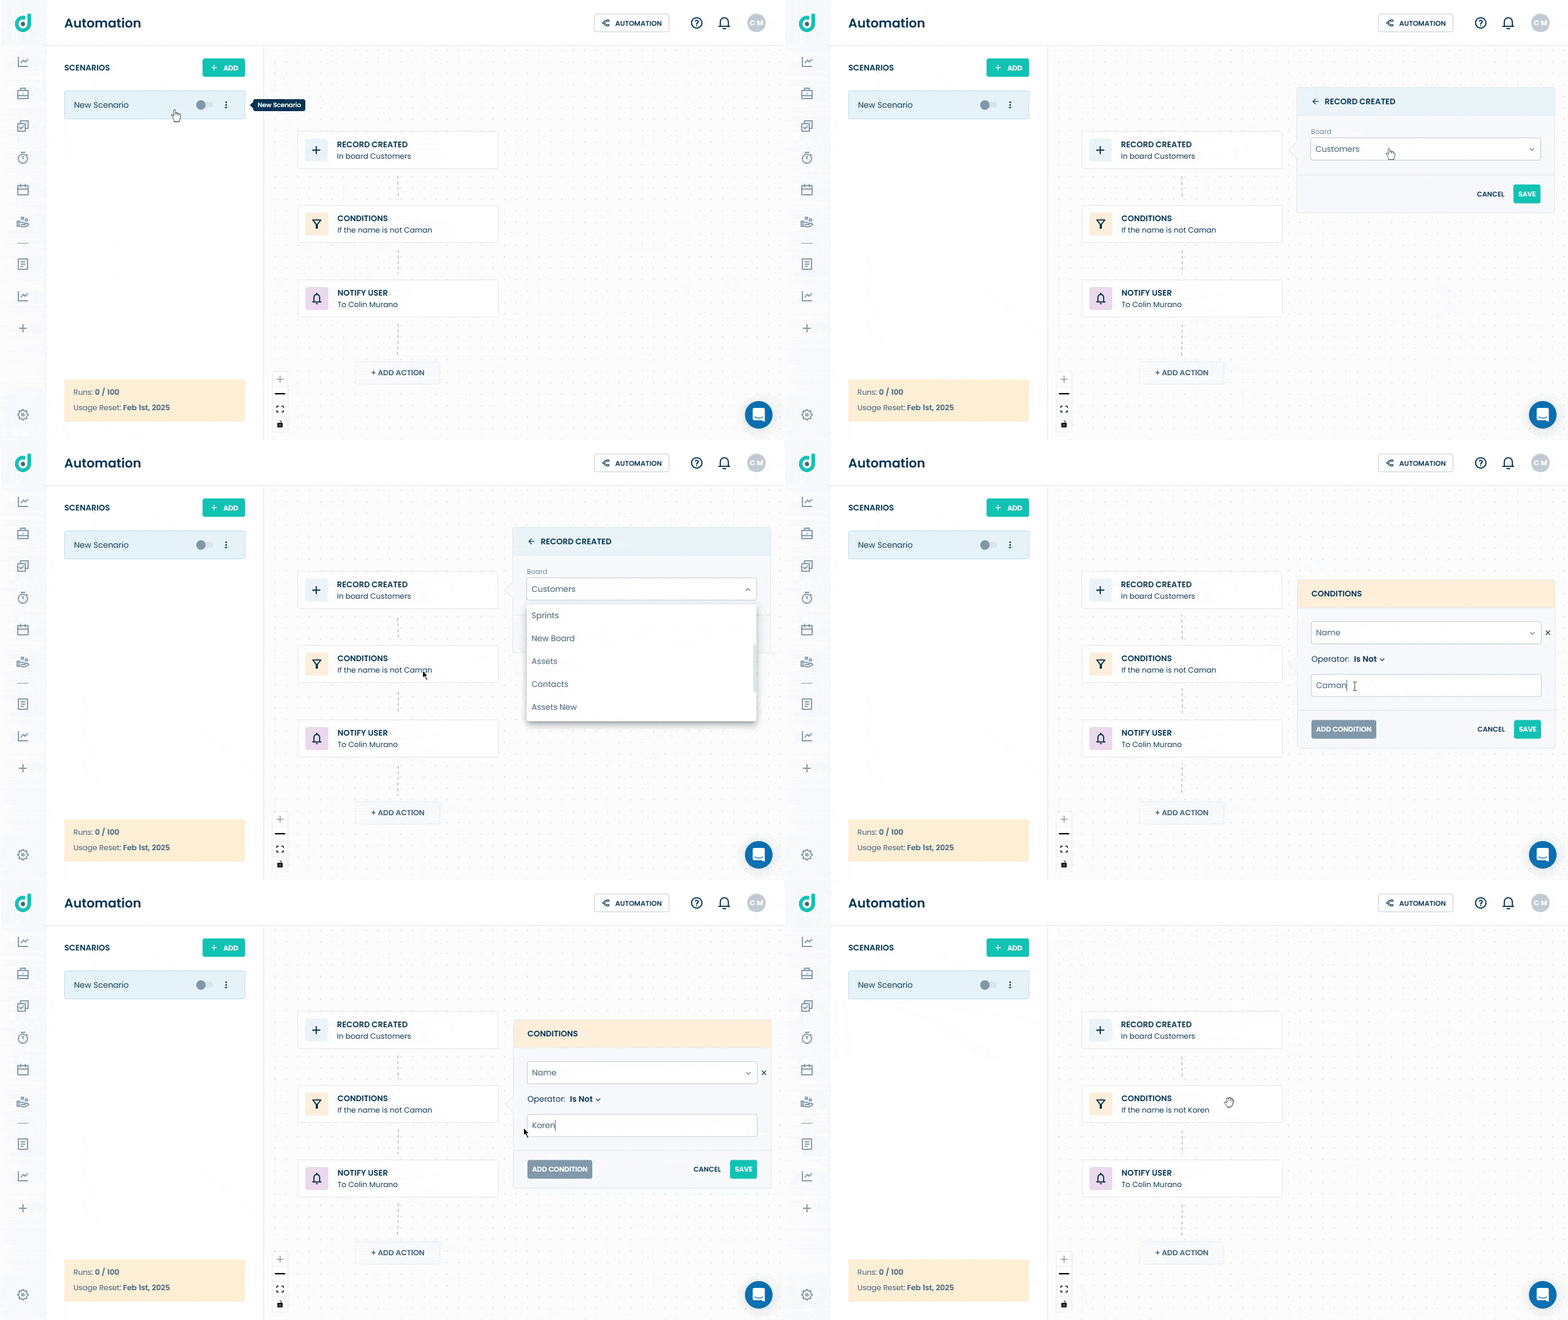
Allows you to modify or change the trigger, conditions, or actions of the scenario. Click on the Scenario and then make the required update.
Edit
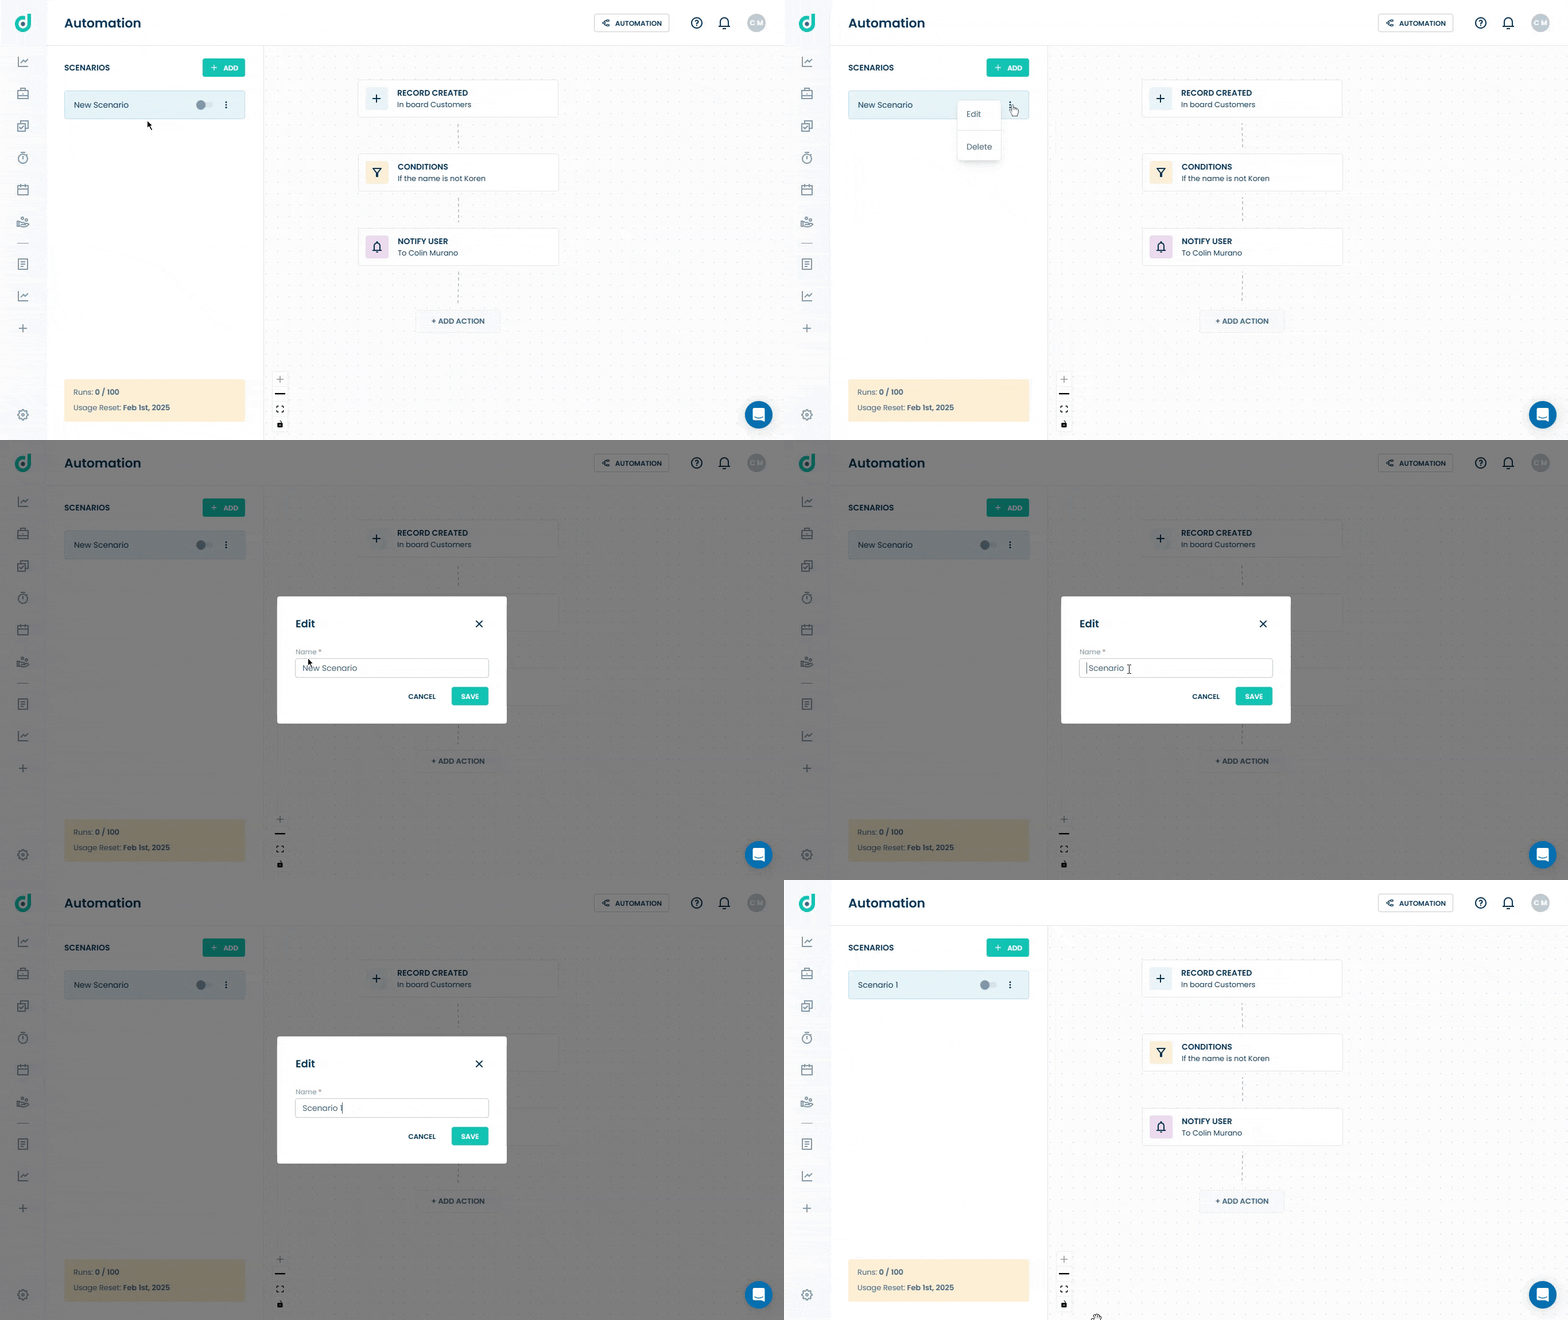
Allows you to edit the name of a created scenario. Click on the Vertical ellipsis (three dots) and select the Edit option.
Delete
Allows you to remove an existing scenario in case it's no longer required. Click on the Vertical ellipsis (three dots) and select the Delete option.
